
- Top Parks for Wildlife: Yellowstone (bison, wolves, grizzlies), Grand Teton (moose, bald eagles), Glacier (mountain goats, bighorn sheep), Everglades (alligators, birds), and Great Smoky Mountains (black bears, elk).
- Best Times: Early morning or late afternoon for soft light and active animals. Seasons like spring (newborns) and fall (rutting) are ideal for specific species.
- Gear Recommendations: Use telephoto lenses (200-600mm) for safe distances, mirrorless cameras with animal tracking, and tripods or gimbals for stability. Bring extra batteries, memory cards, and protective gear for unpredictable weather.
- Ethics and Safety: Maintain proper distances (100 yards from bears/wolves, 25 yards from other wildlife), avoid feeding animals, and respect park rules.
- Permits: Small-scale photography (groups of 8 or fewer) usually doesn’t require permits, but drones are banned.
Wildlife photography in national parks combines preparation, patience, and respect for nature. Follow these tips for safer, more rewarding experiences while protecting the animals and their habitats.
Equipment for Wildlife Photography
Cameras and Lenses
Modern mirrorless cameras are a game-changer for wildlife photography, offering silent shutters and advanced tracking features like “Animal Eye AF” and “Bird Eye AF.” These technologies ensure sharp focus even during fast movements.
For low-light conditions and high-resolution images, full-frame cameras like the Nikon Z6 III (around $2,100) or Sony a7 IV (approximately $2,500) are excellent choices. If you’re looking for extended telephoto reach, APS-C models such as the Canon EOS R10 (about $1,000) or Nikon Z50 (roughly $756) are worth considering due to their 1.5x crop factor.
"The 1.5x crop factor of APS-C works to the wildlife photographer’s advantage, effectively extending the reach of telephoto lenses."
– Imaging Resource Staff
When it comes to lenses, telephoto zooms like 100-400mm or 200-600mm (priced around $2,000) give you the flexibility to reframe quickly as animals move. Prime lenses, such as a 600mm f/4 (around $13,000), provide unmatched sharpness and wide apertures, ideal for low-light conditions at dawn or dusk. However, they can be heavier and more expensive. Burst rates of 10–15 frames per second are sufficient for most wildlife scenarios, though some top-tier models can hit speeds of 30–120 fps. Additionally, pre-capture technology ensures no critical moments are missed by saving images in the buffer before the shutter is fully pressed.
To make the most of these features, having the right support gear and accessories is just as important.
Additional Equipment
Stabilization is key when using heavy telephoto lenses. Gimbal heads paired with carbon fiber tripods allow smooth tracking, while bean bags work well for shooting from vehicle windows or natural blinds.
Binoculars with 8x to 10x magnification or a spotting scope can help you locate wildlife from a safe distance before you start shooting. Since field conditions can be unpredictable, especially in national parks, you should carry three to four spare batteries for cold weather, high-speed CFexpress Type B cards for burst shooting, and protective gear like rain covers, lens coats, and dry bags to shield your equipment.
A well-rounded kit also includes practical field essentials: a camera backpack with rear-panel access for wet environments, a headlamp for navigating in low light, bear spray for safety in grizzly territory, and a small seat pad for comfort during extended waits in a hide.
sbb-itb-00512f3
Wildlife Photography in Grand Teton National Park with Nate Luebbe
Best National Parks for Wildlife Photography
Top 5 National Parks for Wildlife Photography: Species and Best Seasons
Parks with Well-Known Wildlife
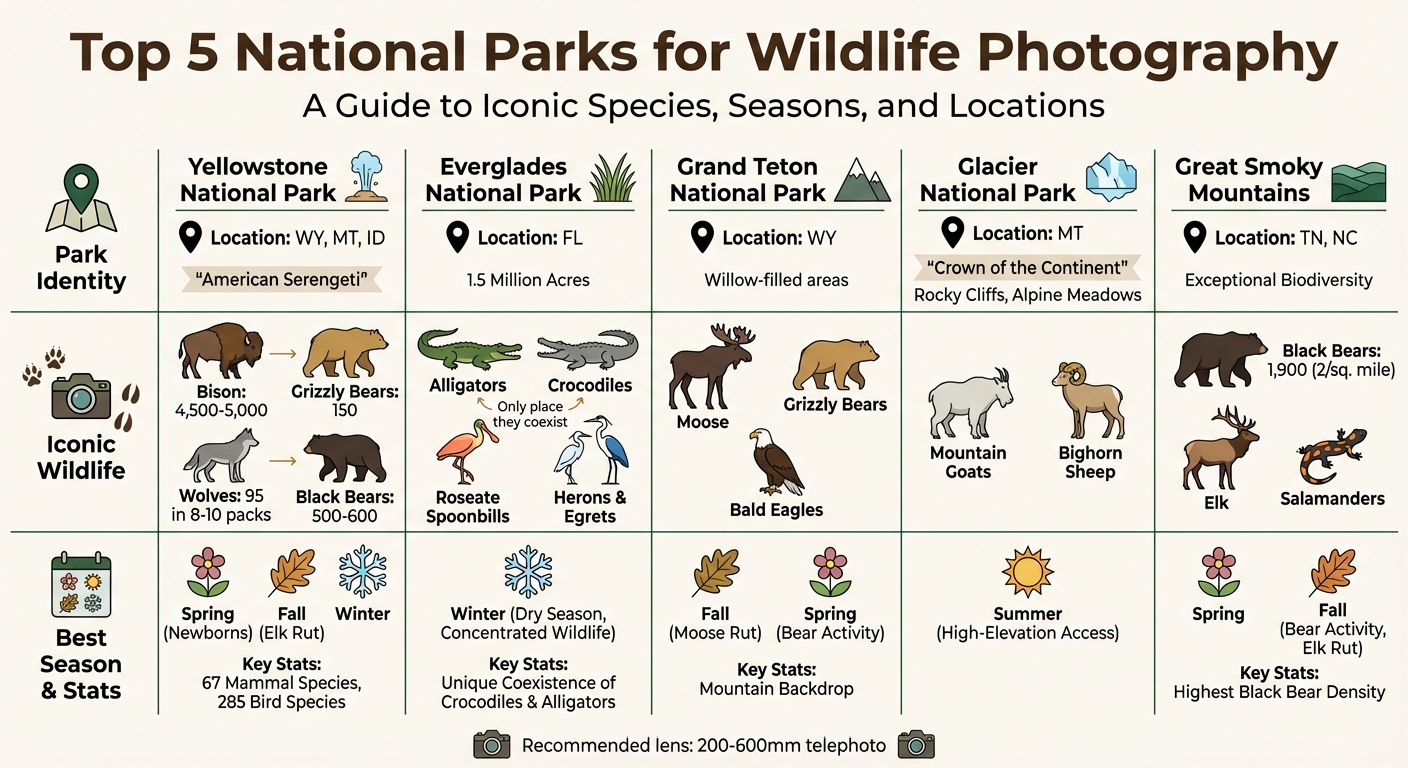
If you’re looking to capture some of the most iconic wildlife in the United States, Yellowstone National Park is hard to beat. Spanning Wyoming, Montana, and Idaho, it’s often called the "American Serengeti" for its incredible biodiversity. The park is home to 67 mammal species and 285 bird species, including the largest free-roaming bison herd in the U.S., numbering around 4,500–5,000 animals. You’ll also find 8–10 active wolf packs (approximately 95 wolves), 150 grizzly bears, and 500–600 black bears roaming its vast landscapes.
"Yellowstone stands as perhaps the premier wildlife photography destination in the United States."
– Chris Weber, Co-Founder, Animals Around The Globe
Grand Teton National Park, also in Wyoming, offers dramatic mountain views and abundant wildlife like moose and grizzly bears. The park’s willow-filled areas are particularly good for spotting these species, making it a favorite among photographers looking for large mammals.
For those drawn to alpine wildlife, Glacier National Park in Montana is a must-visit. Known as the "Crown of the Continent", it provides opportunities to photograph mountain goats on rocky cliffs and bighorn sheep grazing in high-altitude meadows.
If subtropical ecosystems are more your style, Everglades National Park in Florida is unmatched. Spanning 1.5 million acres, it’s the only place in the world where crocodiles and alligators coexist. The park is also a haven for bird photography, featuring species like roseate spoonbills, herons, and egrets.
Finally, Great Smoky Mountains National Park, straddling Tennessee and North Carolina, is famous for its incredible biodiversity. With about 1,900 black bears – roughly two per square mile – it’s a prime location for bear photography. The park also hosts elk and is rich in amphibian species, including salamanders.
| National Park | Iconic Wildlife Species | Best Season |
|---|---|---|
| Yellowstone | Bison, Grizzly Bears, Wolves | Spring (newborns), Fall (elk rut), Winter |
| Everglades | Alligators, Spoonbills, Herons | Winter (dry season, concentrated wildlife) |
| Grand Teton | Moose, Grizzly Bears, Bald Eagles | Fall (moose rut), Spring (bear activity) |
| Glacier | Mountain Goats, Bighorn Sheep | Summer (high-elevation access) |
| Great Smoky Mountains | Black Bears, Elk, Salamanders | Spring/Fall (bear activity, elk rut) |
Next, let’s delve into specific hotspots within these parks to get the best shots.
Specific Locations Within Parks
In Yellowstone, Lamar Valley, nicknamed "America’s Serengeti", is a prime spot for wildlife photography. Stretching 50 miles from Mammoth Hot Springs to the park’s Northeast Entrance, it’s a hotspot for wolf packs, bison herds, and pronghorn. Spring (April–June) is especially great for capturing images of bison calves. Nearby, Hayden Valley offers frequent grizzly bear sightings and wolf pack activity, while the Tower-Roosevelt area, near Tower Fall, is known for black bears – particularly mothers with cubs in May and June.
Over in the Everglades, the Anhinga Trail is a compact boardwalk that attracts alligators, herons, egrets, and anhingas, all within close range for photography while maintaining safe distances. Other great spots include Mrazek Pond and Shark Valley, which teem with wading birds and reptiles.
At Grand Teton, Oxbow Bend and the Snake River’s willow thickets are excellent for spotting moose, while Antelope Flats offers a chance to photograph bison and pronghorn with the stunning Teton Range as a backdrop.
In Glacier National Park, Logan Pass and the Many Glacier area provide access to high elevations where mountain goats scale cliffs and bighorn sheep roam alpine meadows.
For all these locations, a telephoto lens with a range of 200–600mm is highly recommended. This allows you to frame intimate shots while respecting the necessary viewing distances for safety and wildlife preservation.
Field Photography Techniques
How to Photograph Wildlife
To capture stunning wildlife photos, aim to shoot during the golden hours – early morning or late afternoon. These times offer soft, warm light and coincide with heightened animal activity. Avoid the harsh midday sun, which can create unflattering shadows and overly bright highlights.
Stability is key for sharp images. Whenever possible, use a tripod or monopod. If you’re traveling light, improvise by resting your camera on a stable surface like a boulder, a tree trunk, or even your car’s door frame. Shooting handheld? Brace your elbows against your chest or knee to steady your shot. For action shots, opt for fast shutter speeds – at least 1/1000s for general movement and 1/2000s for birds in flight. Burst mode can also help you capture fleeting, unpredictable moments.
"Ensure that at least the subject’s eyes are in sharp focus."
– Matt Poole, Visitor Services Manager, Parker River National Wildlife Refuge
Focus on the eyes – sharp eyes can create a strong emotional connection, even if the rest of the image is slightly soft. Use continuous autofocus (AI Servo or AF-C) to track moving animals effectively. For composition, the rule of thirds works well: position the animal near one of the intersection points and place the horizon along the lower third of the frame.
Whenever possible, shoot from the animal’s eye level. This perspective creates a sense of intimacy, pulling viewers into the subject’s world. While close-up portraits can be striking, don’t shy away from wider shots that show the animal in its natural environment – they can add depth and context to your story.
Patience pays off. Many seasoned photographers spend hours – or even entire days – observing wildlife from a safe, hidden spot to capture authentic, natural behaviors.
Safety and Ethics
Capturing great photos is important, but respecting wildlife and staying safe should always come first.
Maintain a safe distance as outlined by federal guidelines. A telephoto lens allows you to fill the frame while keeping a respectful space between you and the animal.
"If you are close enough to take a selfie, you are wayyyy too close."
– National Park Service
Be observant for signs of stress, such as pinned-back ears, wide eyes, alarm calls, or sudden changes in behavior. If you notice any of these, back away immediately. If an animal approaches you, it’s your responsibility to increase the distance – don’t wait for it to retreat.
Never feed or bait wildlife. Not only is it unethical, but it’s also illegal in many areas, including national parks. Feeding animals can lead to dangerous situations. As Yellowstone National Park officials warn: "A fed animal is a dead animal – good or bad, the Park Service will destroy animals that are habituated to human contact and food." Similarly, using bird calls or sound apps to attract wildlife disrupts their natural behaviors and adds unnecessary stress.
Your vehicle can serve as a quiet, stable blind, helping you stay unnoticed while reducing movement and noise. Always stay vigilant of your surroundings to avoid accidents or unexpected encounters with other wildlife.
"The ethics of photography are the same as the ethics of life, and all revolve around respect."
– Beverly Joubert, Photographer, National Geographic
Permits, Rules, and Trip Planning
Photography Permits and Park Rules
Thanks to the EXPLORE Act, signed into law on January 4, 2025, most wildlife photographers can skip the hassle of obtaining a permit. If your group has eight or fewer people and you’re using only hand-carried equipment in public areas, you’re typically in the clear – whether you’re shooting for social media, a nature magazine, or even a school project.
However, permits are required if your group exceeds eight people, you’re using larger equipment like lighting rigs or generators, or you need exclusive access to a specific location. Photography workshops run as a business usually require a Commercial Use Authorization (CUA), regardless of the group size. To avoid last-minute surprises, always check with the park’s administrative office before your visit, as local rules may vary and could include additional restrictions.
One thing to note: drones are completely off-limits in major parks like Yellowstone and Grand Canyon. This rule protects both wildlife and the overall visitor experience. Additionally, photographers must maintain a safe distance from wildlife – 100 yards (91 meters) from bears and wolves, and 25 yards (23 meters) from all other animals. When in thermal areas, stick to boardwalks and marked trails, and keep tripod legs on safe surfaces to avoid dangerous spots like boiling water near hot springs.
Trip Preparation
Once you’ve got the permitting and park rules sorted, it’s time to focus on planning your trip. Wildlife photography often means long hours in remote areas with unpredictable weather, so preparation is key. Make sure to pack layers, extra memory cards, and fully charged batteries – charging options are rare in these locations.
If you’re heading into bear country, don’t forget bear spray, and make sure you know how to use it. It’s also a good idea to register your itinerary with park rangers. Essentials like a first aid kit, sunblock, and plenty of water are must-haves. Lastly, grab a park map and newsletter at the entrance for updates on road closures, construction, or recent wildlife activity – it’s information that can make or break your trip.
Conclusion
This guide has covered the key techniques and ethical principles needed to ensure your wildlife photography contributes to conservation efforts. Capturing images in national parks does more than document nature – it helps raise awareness and support for preserving it. With 1 in 4 species currently facing extinction, your photographs have the power to inspire action. But remember, great photography begins with respecting wildlife.
The essentials shared here include using telephoto lenses to keep a safe distance, shooting during the golden hours when animals are most active, and adhering to park regulations. Above all, the core principle is this: the welfare of the animal must always come first. As Beverly Joubert, a National Geographic photographer, wisely states:
"The ethics of photography are the same as the ethics of life, and all revolve around respect."
Your actions in the field carry weight. Animals that grow accustomed to human presence often face serious risks, and maintaining safe distances protects both the wildlife and yourself.
Equally important is being transparent about your process. Ethical photography isn’t just about the shot – it’s about honesty in how the image was created. Joel Sartore, another National Geographic photographer, emphasizes this point:
"Level with the reader. Tell them the backstory if there’s something about how the image was made that isn’t obvious just by viewing it."
FAQs
What camera settings should I start with for wildlife?
To get the best wildlife shots, start by shooting in RAW format. This ensures you capture the highest image quality and have more flexibility during editing. Set your camera to auto white balance to adapt to changing light conditions, and use 3D-tracking autofocus to effortlessly follow moving animals.
Enable ISO auto sensitivity and set a maximum limit (like 2000) to handle shifts in lighting without introducing too much noise. For action shots, stick to a shutter speed of at least 1/500 sec or faster to freeze motion effectively. These settings create a solid base for capturing clear, sharp images of wildlife in action.
How can I find animals without getting too close?
To observe wildlife responsibly, use tools like binoculars, spotting scopes, or telephoto lenses to maintain a safe distance. Keep at least 40 feet away from animals such as deer and 150 feet from larger species. Your vehicle can be an effective observation point, acting as a blind that lets you watch without disturbing the animals. Always prioritize safety and respect for wildlife by adhering to these guidelines, ensuring the animals remain undisturbed and safe.
When do I need a permit for photography in a national park?
If you’re planning commercial filming or an activity involving more than eight people, you’ll need a permit. For smaller photography sessions with eight or fewer people, a permit usually isn’t necessary – provided you’re in public areas, using only hand-carried equipment, not reserving exclusive space, and ensuring no harm to park resources or disruption to other visitors. Always review the specific guidelines for the park you’re visiting to stay within the rules.