
If you’re planning an overnight trip in a national park’s wilderness, you’ll need a permit. These permits help manage visitor numbers, protect natural areas, and ensure safety. Here’s what you need to know:
- Why Permits Are Required: They prevent overcrowding, minimize environmental damage, and help rangers monitor safety.
- How to Get a Permit: Many parks use Recreation.gov for reservations. Apply early for popular areas like Yosemite, where permits can be highly competitive.
- Walk-Up Options: Missed the reservation window? Some parks offer same-day permits – arrive early to increase your chances.
- Fees and Rules: Costs and regulations vary by park. Prepare to follow specific guidelines for camping, waste disposal, and food storage.
- Safety Briefings: When picking up your permit, you’ll often receive updates on trail conditions and wildlife precautions.
Plan ahead and follow park rules to enjoy a safe and responsible wilderness experience.
Wilderness Permit Requirements
Why Parks Require Permits
Wilderness permits serve several purposes: they help control visitor numbers, focus human impact, and improve safety. These measures form the backbone of the protocols outlined below.
Without limits, popular trails can become overcrowded, ruining the solitude many seek in nature. Permits also help protect the environment by channeling activities like camping and waste disposal into specific areas. As Glacier National Park explains:
By concentrating impacts, including eating, sleeping, and human waste disposal, we prevent degradation of a broader area.
This approach preserves untouched landscapes by guiding visitors to designated zones.
Permits also play a role in safety. They allow rangers to track hikers, locate those who are overdue, and provide essential updates during pre-trip briefings. While these goals are common across parks, the rules and processes for obtaining permits differ significantly.
How Rules Differ Between Parks
Permit systems are tailored to the unique needs of each park and its visitors. For example, Yosemite National Park allocates 60% of its permits through a lottery held 24 weeks in advance, while the remaining 40% are made available exactly seven days before the trip. Glacier National Park, on the other hand, reserves 30% of its backcountry sites for walk-up campers who arrive the day before or the day of their trip.
The application process also varies. Typically, you’ll need to provide details like your full name, contact information, trailheads with specific dates, group size, and planned overnight locations. Some parks may ask for additional declarations, such as confirming watercraft inspections or agreeing to use bear canisters. Additionally, most systems allow you to name up to three alternate trip leaders who can pick up the permit on your behalf if needed.
Fees and group size limits differ as well. Glacier charges $10 plus $7 per person per night from May 1 to October 31, while Yosemite applies a $10 application fee plus $5 per person for confirmed permits. Group sizes are capped differently too – Glacier limits groups to 12 people, whereas Yosemite allows up to 15 on certain trailheads. During the winter season (typically November through April), many parks switch to free self-registration permits available at ranger stations, though quotas may still apply in high-demand areas.
sbb-itb-00512f3
How to Book Backcountry Permits on Recreation.gov (Early Access Secrets)
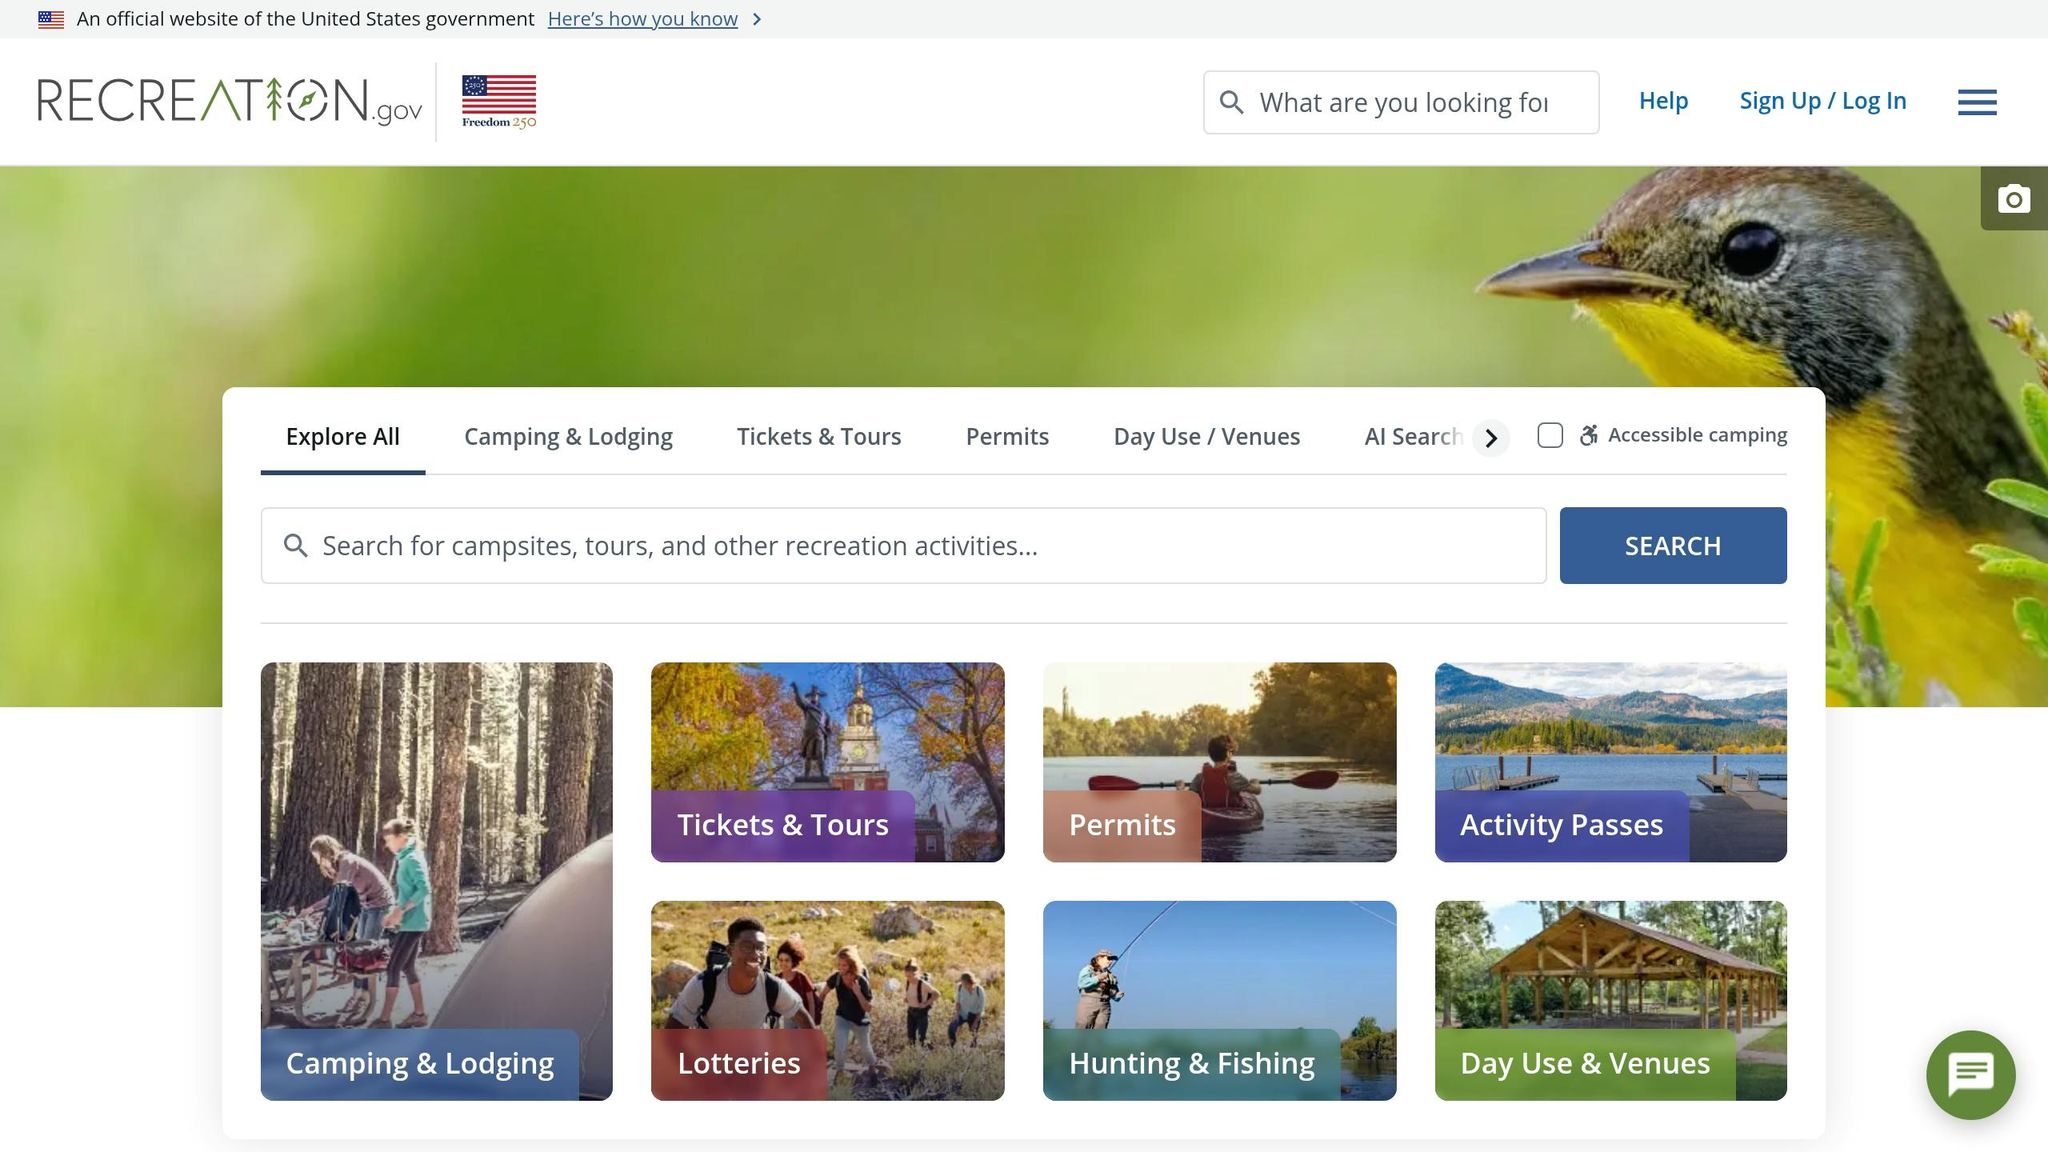
How to Get Wilderness Permits
If you’re planning to explore the backcountry, understanding how to secure a wilderness permit is essential. Here’s a guide to help you navigate the process.
Reserving Permits Through Recreation.gov
Many national parks now use Recreation.gov for advance wilderness permit reservations. To get started, create an account before the reservation window opens. This step is crucial because permits for popular trailheads tend to sell out fast.
Once logged in, search for the specific park by typing something like "Canyonlands National Park Overnight Backcountry Permits." Click "Check Availability" to view a calendar showing available dates and campsites. Open slots are marked in blue, with numbers indicating the maximum group size allowed.
When planning your trip, you’ll need to select each night of your itinerary in order. Start with your first night, then add subsequent nights chronologically. If you need to change the first night, you’ll have to deselect all following nights first. Once your itinerary is set, click "Book Now" to begin a 15-minute countdown to complete your purchase.
Make sure you have the following details ready:
- Your full name and emergency contact information
- Vehicle details (make, model, and license plate)
- Payment method
During the reservation process, list an alternate trip leader. Permits are non-transferable, so only you or the alternate can use the permit if plans change. Before checking out, review the "Need to Know" section for park-specific rules.
For first-come, first-served reservations, some parks, like Yosemite, release 40% of their permits exactly seven days in advance at 7:00 a.m. PDT. The National Park Service emphasizes:
Popular trailheads will fill very quickly; be logged on and ready to reserve promptly at 7 am PDT seven days in advance of your desired start date.
Keep in mind that Yosemite limits users to six active future reservations at any given time.
If advance reservations are unavailable, walk-up or same-day permits can be a good backup.
Walk-Up and Same-Day Permits
Missed the online reservation window? Walk-up permits might save the day. These permits are typically available the day before or the day of your trip.
To improve your chances:
- Arrive early at the wilderness permit office or ranger station. Many offices stop issuing permits 30 minutes before closing. For example, Glacier National Park stops issuing them after 4:30 p.m..
- As the National Park Service advises:
Arrive early the day before your intended trip start date for the best campsite availability.
Some parks now release their walk-up quota online via Recreation.gov instead of in person. Check your park’s specific system ahead of time.
When picking up your permit, you may need to attend a safety briefing or watch videos on topics like bear safety and Leave No Trace principles. Some parks offer these videos online to streamline the process. Always have backup trailheads in mind, as availability may be limited.
Finally, remember that a reservation confirmation isn’t enough – you must exchange it for an official permit at a ranger station. Print and sign a physical copy or pick up the official permit before heading into the wilderness.
Once you have your permit, take time to review the rules for overnight camping and safety guidelines to ensure a smooth and enjoyable adventure.
Overnight Camping Rules and Safety
With your permit in hand, it’s important to follow camping and safety guidelines. These not only protect the wilderness but also ensure your safety. By respecting these rules, you help preserve fragile ecosystems and reduce the risk of dangerous wildlife encounters.
Leave No Trace Basics
The seven Leave No Trace principles are the backbone of responsible wilderness camping. Start by planning ahead: check the weather forecast and pack the right gear. Stick to durable surfaces such as established campsites, rock, gravel, or dry grass to minimize your impact.
Campsite rules can vary widely between parks. For example, Rocky Mountain National Park prohibits dispersed camping, requiring visitors to use designated sites. Yosemite, however, permits dispersed camping in most areas, as long as it’s at least 100 feet away from water sources and trails. Some parks go further – Rocky Mountain National Park enforces a 200-foot distance from water to protect sensitive riparian zones.
When it comes to human waste, dig a "cathole" about 6 inches deep, at least 100 to 200 feet from water, campsites, and trails. Avoid tossing food scraps, tea bags, or coffee grounds into campfires – they don’t burn hot enough to eliminate odors, which can attract wildlife. Similarly, wash dishes right after use and always at least 100 to 200 feet from water sources.
As Rocky Mountain National Park puts it:
Your permit is a contract between you and the National Park Service stating that you agree to treat with respect and take care of the wilderness.
Campfire rules also vary. Some parks, like Rocky Mountain National Park, ban campfires entirely in wilderness areas. Yosemite allows fires in established rings but prohibits them above 9,600 feet. Using portable stoves is often a better option. The remaining Leave No Trace principles – leave what you find, respect wildlife, and be considerate of others – are all about keeping these natural spaces pristine for future visitors. Securing your food is another critical step in maintaining campsite safety.
Bear Safety and Food Storage
Bears have an extraordinary sense of smell and consider almost anything scented to be food – this includes toiletries, cosmetics, trash, fuel, and even bug spray. The National Park Service stresses:
Storing your food and disposing of garbage properly can mean life or death to a bear.
In areas like Yosemite and Rocky Mountain National Park, you’re required to use hard-sided, commercially made bear canisters for overnight food storage. Yosemite no longer allows "counterbalance" hangs and mandates canisters, with fines up to $5,000 for non-compliance.
Place your locked canister on flat, level ground, at least 100 feet from your sleeping area and away from cliffs or water sources. Never tie ropes to a canister – bears can drag it away if they grab the rope. A handy trick: stack pots and pans on top of the canister at night. If a bear disturbs it, the noise will alert you.
During daylight hours, keep food within reach and never leave your backpack unattended. To reduce waste and odors, transfer food into resealable bags instead of leaving it in its original packaging. If you encounter a bear, stay at least 50 yards away in undeveloped areas. Keep your group close, secure children, and avoid running. In developed areas, you can scare off a bear by yelling loudly and acting aggressively. Always report bear sightings to park rangers – Yosemite even has a "Save-a-Bear" hotline at 209/372-0322.
As Yosemite National Park reminds visitors:
By storing your food properly, you can prevent a bear’s unnecessary death.
Bears that become accustomed to human food lose their natural fear of people, which often leads to shorter lifespans compared to bears that stick to their natural diet.
Tips and Mistakes to Avoid
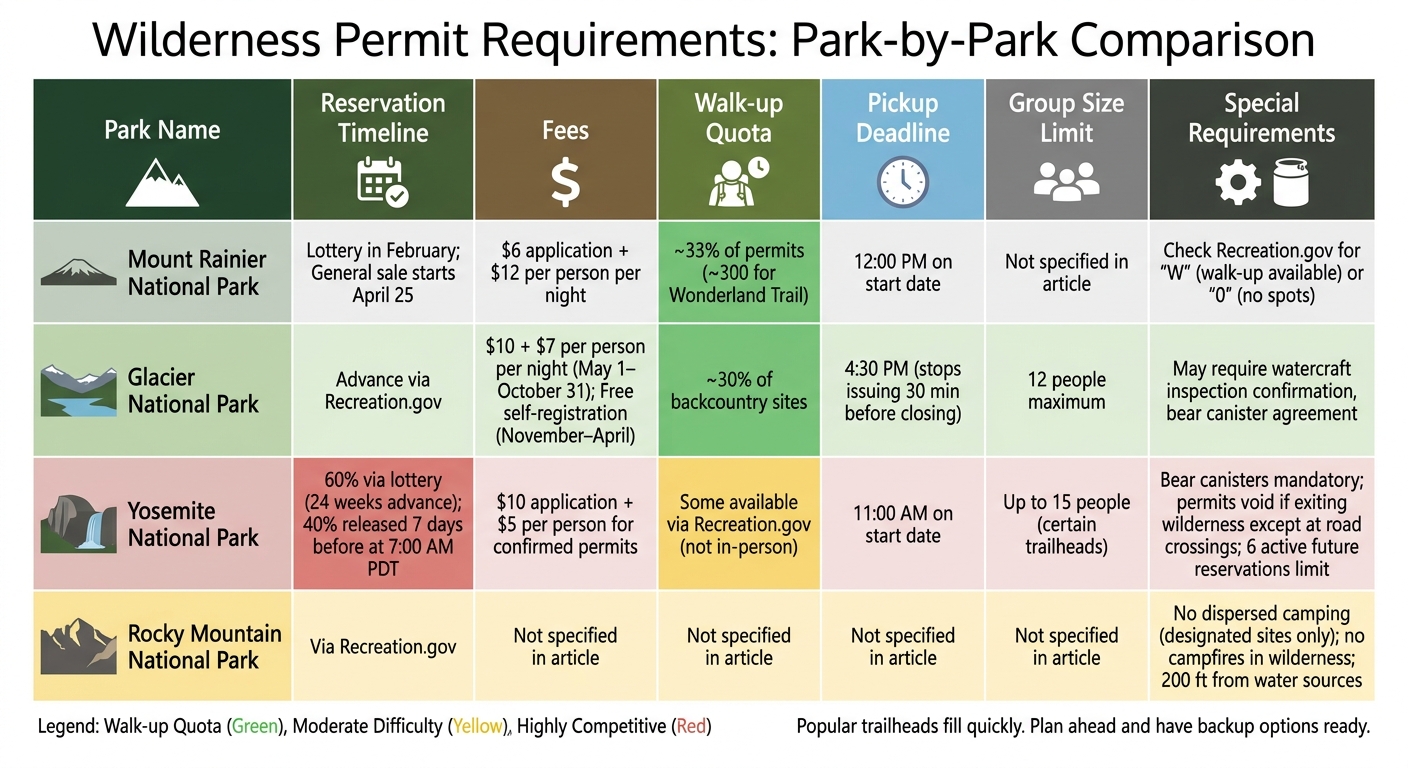
National Park Wilderness Permit Requirements Comparison Chart
Planning for permits can be tricky, but with the right approach and awareness of common mistakes, you can improve your chances of success. Let’s dive into some key tips and potential pitfalls.
How to Secure Permits Successfully
Set alerts for key reservation windows. For example, Mount Rainier’s early access lottery kicks off in February, with general sales starting April 25. Yosemite, on the other hand, releases 40% of its permits seven days in advance at 7:00 AM PDT. Be punctual – missing these windows by even a few minutes could mean losing your spot.
Aim for mid-week starts. Starting your trip on a Tuesday or Wednesday can reduce competition. If you’re planning to get a walk-up permit, arrive at the park early the day before your trip. Mount Rainier, for instance, reserves around 300 Wonderland Trail permits for walk-up visitors.
Always have backup plans. Rangers won’t create your itinerary for you, so showing up unprepared could leave you stranded. Map out at least two or three alternative routes and stay flexible with trailheads, campsites, or even the direction of your hike. Before heading out, check Recreation.gov for updates. For Mount Rainier, a "W" indicates walk-up availability, while a "0" means no spots are left.
While these strategies can help, being aware of common errors can save you from unnecessary headaches.
Common Permit Mistakes
Missing permit pickup deadlines. This is a frequent issue. For instance, Yosemite cancels permits not picked up by 11:00 AM on the start date, while Mount Rainier’s deadline is 12:00 PM. If you’re running late, contact the park in advance, or your permit may be given to someone else. Remember:
A digital or paper permit reservation confirmation is not a valid permit.
You must activate your reservation in person at a designated wilderness center.
Exiting the wilderness improperly. In Yosemite, leaving the wilderness – except at designated road crossings – voids your permit entirely. If that happens, you’ll need to apply for a new one to continue your trip. Also, avoid planning routes that are unrealistic. For example, Mount Rainier’s system blocks reservations for campsites more than 17.5 miles apart.
Incorrectly listing alternate leaders. In the Grand Canyon’s weighted lottery, listing a Potential Alternate Trip Leader (PATL) with fewer points than the primary leader lowers your entire application’s score. Additionally, most permits are non-transferable, so if the primary leader can’t go and no alternates are listed, the trip may need to be canceled.
Park Reservation Comparison Table
The table below outlines key details for some popular parks, including reservation timelines, fees, and walk-up quotas.
| Park | Reservation Timeline | Fees | Walk-up Quota | Pickup Deadline |
|---|---|---|---|---|
| Mount Rainier | Lottery (Feb); General sale (April 25) | $6 + $12/person/night | ~1/3 of permits | 12:00 PM on start date |
| Glacier | Advance via Recreation.gov | $10 + $7/person/night (May–Oct) | ~30% of sites | 4:30 PM |
Conclusion
As mentioned earlier, getting a wilderness permit requires careful planning and some flexibility. For instance, Yosemite sees an overwhelming number of requests – around 300 to 500 each day – with as many as 90% of John Muir Trail applications rejected during peak periods. To improve your chances, submit your application early, whether it’s 24 weeks in advance through the lottery or at 7:00 AM PDT for the week-ahead releases.
Once you’ve secured your permit, following park rules is essential for both safety and conservation. Keep at least 200 feet away from water sources and trails, and don’t forget to use bear canisters where required. These guidelines help minimize human impact and preserve the untouched beauty of the wilderness.
Make sure to complete all necessary steps for your permit, including picking it up on time, carrying the physical copy, and sticking to your approved itinerary. Staying informed about current road and trail conditions is also crucial to avoid any issues that could void your permit.
FAQs
Do I need a permit for a one-night backcountry trip?
Yes, many wilderness areas in the U.S., including national parks like Yosemite and Glacier, require permits for overnight backcountry trips. These permits are in place to help preserve the natural environment and maintain a quieter, more secluded experience for visitors. Be sure to review the specific park’s rules and guidelines ahead of your trip to confirm what’s needed.
What should I do if my permit start date changes?
If the start date on your permit changes, it’s essential to contact the park’s permit office right away. Let them know about the change and ask about your options for modifications or reapplying. Some parks, such as Yosemite, have strict rules about fixed dates once permits are issued, so acting quickly is key. Since procedures can differ from park to park, it’s a good idea to review the specific guidelines for the park in question or reach out to them directly for detailed instructions.
Can I change my trailhead or campsites after I book?
Yes, it’s often possible to adjust your trailhead or campsites after booking, typically when you pick up your permit. However, any changes need to follow park rules and the conditions outlined in your permit. Be sure to review the specific guidelines for the park you’re visiting for more details.