
In remote national parks, you might be hours – or even days – away from professional medical help. Wilderness First Aid (WFA) is designed to prepare you for emergencies in such situations. Here’s what you need to know:
- Why It’s Important: Hiking in national parks introduces risks like sudden weather changes, wildlife encounters, altitude sickness, and limited resources. In these scenarios, you are often the first responder.
- Training Options: Courses like NOLS Wilderness First Aid (16 hours, $250-$420) and Wilderness First Responder (80 hours, $650-$1,350) teach skills like patient assessment, injury stabilization, and evacuation planning.
- First Aid Kit Essentials: Include bandages, antiseptic wipes, pain relievers, blister treatments, and other basics. Advanced kits for longer trips should also have splints, trauma shears, and rehydration salts.
- Common Injuries: Learn to handle blisters, sprains, cuts, and heat or cold-related illnesses using simple techniques like the RICE method for sprains or proper wound cleaning to avoid infections.
- Emergency Response: Always assess the scene for safety, treat life-threatening conditions first, and know when to evacuate. Tools like personal locator beacons can be lifesaving in areas without cell service.
Preparation is key. WFA training, the right gear, and a solid plan can make all the difference when venturing into the backcountry.
NOLS Wilderness First Aid Instructor explains how to do First Aid Kits

Wilderness First Aid Training and Certifications
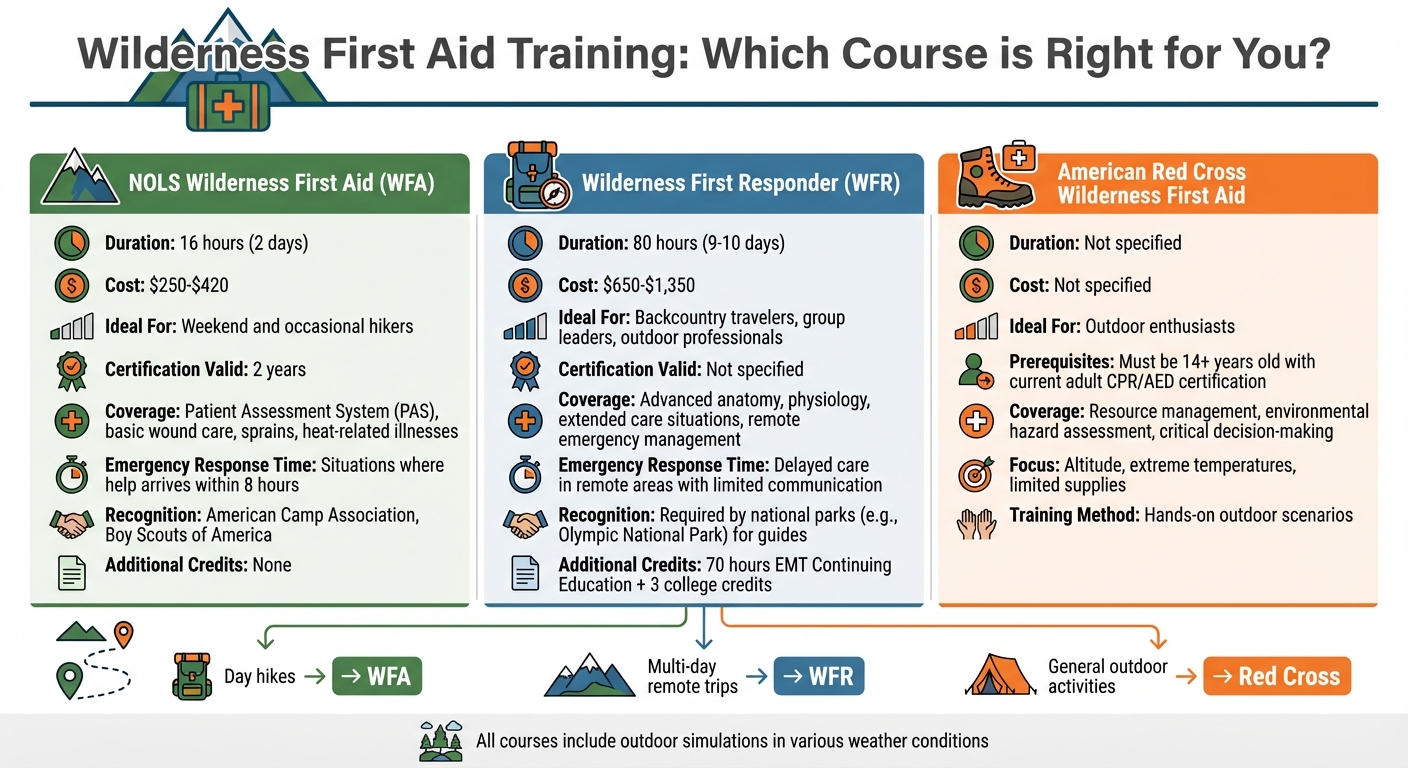
Wilderness First Aid Training Comparison: WFA vs WFR Courses
Wilderness first aid certification equips you to handle emergencies when professional help is delayed. Choosing the right course depends on how frequently you hike, how remote your destinations are, and whether you lead groups. Here’s a breakdown of the main programs available:
NOLS Wilderness First Aid Certification
The National Outdoor Leadership School (NOLS) offers a 16-hour Wilderness First Aid (WFA) course, ideal for weekend and occasional hikers. This two-day program, priced between $250 and $420, covers the Patient Assessment System (PAS), basic wound care, and common injuries like sprains and heat-related illnesses. It’s designed for situations where emergency services can reach you within eight hours.
A WFA certification from NOLS is valid for two years and is recognized by organizations like the American Camp Association and the Boy Scouts of America. The course includes outdoor simulations in various weather conditions, so participants should come prepared with gear for rain or cold.
Wilderness First Responder (WFR) Courses
If you’re heading deep into the backcountry or leading outdoor groups, the Wilderness First Responder (WFR) course is considered the gold standard. This 80-hour course, spread over 9 to 10 days, costs between $650 and $1,350. Gates Richards of NOLS explains that WFR training focuses on handling emergencies in remote areas with limited communication and delayed care.
The WFR curriculum goes beyond basic first aid, covering topics like anatomy, physiology, and decision-making during extended care situations. The course is pre-approved for 70 hours of EMT Continuing Education and offers 3 college credits through partner universities. Many national parks, such as Olympic National Park, require guides to hold a current WFR certification. This training is especially important for those leading groups or traveling to remote international locations.
American Red Cross First Aid Training
The American Red Cross also offers first aid programs tailored for outdoor enthusiasts. Participants must be at least 14 years old and have a current adult CPR/AED certification. Like NOLS, the Red Cross courses include hands-on outdoor scenarios to mimic real-life conditions.
These programs focus on resource management and assessing environmental hazards, such as altitude, extreme temperatures, or limited supplies. They also emphasize critical decision-making, like whether to evacuate or stay put, helping prevent minor issues from escalating into serious emergencies.
How to Build a Hiking First Aid Kit
Having a well-prepared first aid kit is essential for safe hiking and complements any wilderness first aid training you’ve undertaken. As one of the "10 Essentials", your kit should be tailored to the trip’s length, terrain, group size, and personal needs. A short hike on a paved trail might only require the basics, while a multi-day backcountry trek demands a more comprehensive setup.
10 Core Items for Every First Aid Kit
Every hiking first aid kit should include the following essentials:
- Bandages for treating cuts and scrapes
- Antiseptic wipes (BZK-based or alcohol) to clean wounds
- Antibiotic ointment to prevent infections
- Pain relievers like ibuprofen or acetaminophen
- Blister treatment such as moleskin or hydrogel pads
- Tweezers for removing splinters, stingers, or ticks
- Medical tape to secure gauze
- Sterile gauze pads (2×2 or 4×4) for larger wounds
- Antihistamines for allergic reactions
- Medical gloves to protect both you and the injured individual
Store medications in labeled, waterproof pill bags to keep them dry and organized. Group similar items together for easy access, and use a waterproof container – like a travel micro-organizer, sealable plastic box, or heavy-duty freezer bag – to protect your supplies. Additionally, every hiker should carry a medical ID card with their name, blood type, allergies, current medications, and emergency contacts.
Basic vs. Advanced First Aid Kits
The type of kit you carry depends on the nature of your hike. Here’s a breakdown:
| Feature | Basic First Aid Kit (Day Hikes) | Advanced First Aid Kit (Multi-Day/Remote) |
|---|---|---|
| Contents | Adhesive bandages, antiseptic wipes, ibuprofen, moleskin, tweezers, and medical gloves. | All basic items plus SAM splints, irrigation syringes, trauma shears, and emergency blankets. |
| Medications | Pain relievers, antihistamines, and personal prescriptions. | Anti-diarrheals, rehydration salts, aspirin (for heart attack response), and glucose for hypoglycemia. |
| Weight | Typically under 1 lb | Often 1.5 lbs or more, depending on group size and trip length. |
| Best For | Short hikes on well-traveled trails like those in Zion or Acadia. | Remote backcountry trips in areas like Denali or the North Cascades. |
Basic kits are great for handling minor issues like blisters, cuts, and insect stings. Advanced kits, on the other hand, are designed for serious injuries and extended care situations where help may take days to arrive. Austin Bragg, a firefighter, paramedic, and instructor, emphasizes the importance of being prepared:
"While being adaptable is a valuable skill, we should never ‘plan to improvise’ when we can simply carry a small pouch filled with essential, purpose-built supplies."
Always check the expiration dates on medications and sterile supplies before heading out, as these items lose effectiveness over time.
Adjusting Your Kit for Different Park Environments
Depending on the environment, you may need to customize your kit to address specific challenges. For example:
- Desert parks like Joshua Tree: Pack electrolyte powders, extra tweezers for cactus spines, and high-SPF sunscreen.
- Alpine areas like Rocky Mountain National Park: Include Mylar emergency blankets for warmth and chemical hand warmers.
- Humid and wet parks like Olympic: Bring antifungal cream for foot care, waterproof bandages, and a fully submersible waterproof case.
- High-altitude destinations like Mount Rainier: Consider altitude sickness medication (if prescribed) and lubricating eye drops for dry air.
To save space and weight, opt for multi-use items. For example, wrap duct tape around your water bottle or trekking pole for quick repairs or securing bandages. Iodine can serve as both a wound antiseptic and an emergency water purifier – use ten drops per quart of cloudy water and let it sit for 30 minutes. Finally, apply moleskin or antibiotic cream at the first sign of a "hot spot" to prevent blisters from forming.
sbb-itb-00512f3
How to Treat Common Hiking Injuries
Handling trail injuries effectively can prevent minor problems from escalating into serious issues. Hiking alone accounts for over 6% of the 200,000+ outdoor recreational injuries treated annually in the United States. Knowing how to respond to these common mishaps can make all the difference.
Blisters and Sprains
Blisters are caused by friction, forming fluid-filled pockets under the skin. Prevention is key – wear properly fitted shoes with moisture-wicking socks and stop immediately if you feel a "hot spot." Apply athletic tape or moleskin to reduce friction [28,6].
If a blister forms but the skin remains intact, avoid popping it. Instead, use the "donut method": cut a piece of moleskin to encircle the blister without covering it, then secure it with gauze [28,29]. For painful blisters likely to burst, carefully sterilize a needle with alcohol or flame, prick the edge to drain the fluid, and leave the skin flap intact. Apply antibiotic ointment and cover with a nonstick bandage [28,32].
Sprains happen when ligaments stretch or tear, often causing swelling, pain, limited mobility, or a "popping" sound at the moment of injury [29,32]. Stop hiking immediately and follow the RICE method:
- Rest: Avoid using the injured limb.
- Ice: Apply ice or cold water for 20 minutes every 90 minutes.
- Compression: Wrap the injury with an elastic bandage, ensuring it’s snug but not too tight.
- Elevation: Keep the injured area raised above heart level.
Over-the-counter pain relievers like ibuprofen or acetaminophen can help with pain and swelling [30,32]. If walking becomes impossible, plan for evacuation [29,32].
Cuts, Scrapes, and Wound Care
Proper wound care is essential to avoid infection. Start by washing your hands thoroughly for 20 seconds and putting on medical gloves.
To stop bleeding, apply firm pressure with sterile gauze or a clean cloth for at least 10 minutes. Once bleeding slows, rinse the wound with 500 ml (17 fl. oz.) of clean, disinfected water. A syringe works well for creating enough pressure to dislodge debris, but you can also use a hydration bladder hose or a perforated plastic bag.
The Center for Wilderness Safety emphasizes:
Early and thorough wound cleaning greatly reduces the risk of infection.
After cleaning, apply antibiotic ointment to a bandage (not directly to the wound) and cover the area with sterile gauze, securing it with medical tape. Studies show that moist wounds heal faster and are less prone to infection than dry ones. Replace dressings every 12 to 24 hours or sooner if they become wet or dirty. Monitor for SHARP signs of infection – Swelling, Heat, Aching pain, Redness, and Pus. Red streaks radiating from the wound are a red flag for serious infection and require immediate medical attention.
For larger cuts, use butterfly bandages or Steri-strips to pull the wound edges together, working from the center outward. However, leave animal bites or puncture wounds open to drain and seek medical care promptly.
Heat Illness and Hypothermia
Extreme temperatures can pose serious risks during hikes. According to NOLS data, heat illness and hypothermia each account for about 0.5% to 0.6% of backcountry medical incidents.
Heat exhaustion symptoms include heavy sweating, weakness, dizziness, nausea, headache, and cool, clammy skin. Move the person to shade, remove excess clothing, and encourage them to sip 8 oz. of water or an electrolyte drink every 15 minutes. Applying cool, wet cloths to the neck, armpits, and groin can help. Recovery usually takes 30 minutes to an hour with proper hydration and cooling.
Heatstroke is more severe, marked by confusion, hot and dry skin, and the absence of sweating. This is a medical emergency. Call for evacuation immediately and cool the person aggressively. Immersion in cold water is most effective, but you can also use wet clothing, fanning, and ice packs on the neck, armpits, and groin to lower body temperature.
Hypothermia occurs when the body loses heat faster than it can produce it, even in summer if a hiker gets wet or exposed to wind. Early signs include shivering, clumsiness, confusion, and slurred speech. As it worsens, shivering stops, coordination fails, and the person may become unresponsive. Remove wet clothing and replace it with dry layers. Insulate them from the ground using sleeping pads or extra clothing. Warm the core with warm water bottles, chemical hand warmers, or body-to-body contact inside a sleeping bag. Offer warm, sugary drinks if they’re alert and able to swallow, but avoid alcohol or caffeine as these can worsen the condition.
Emergency Response and Evacuation Procedures
When a medical emergency happens on the trail, how you respond in those first moments can make all the difference. Start by performing a Scene Size-Up: look for any hazards, put on gloves to protect yourself, and check the patient’s responsiveness. As Tod Schimelpfenig, a NOLS Instructor and WEMT, wisely points out:
Your priority is your safety and that of your fellow first responders.
Identifying and Treating Medical Emergencies
Some conditions demand immediate attention. For example, altitude sickness becomes a threat above 8,000 feet, where the lack of oxygen can cause severe headaches, confusion, or even fluid buildup in the lungs or brain. If symptoms don’t improve with rest, descending to a lower altitude is crucial. Similarly, severe allergic reactions (anaphylaxis) can escalate quickly, as swelling may block airways without prompt treatment.
Dehydration is another underestimated danger. Losing just 10% of your body’s water can reduce your ability to regulate heat by 30–40%. Yosemite Search and Rescue Ranger John Dill highlights this risk:
No Yosemite climber has died from heat, but a half-dozen parties have come close… dehydration will seriously sap your strength, slowing you even further.
On the flip side, hyponatremia – caused by drinking too much plain water without replacing electrolytes – can mimic heat exhaustion. Symptoms like nausea and confusion are red flags. In such cases, encourage salty snacks and rest in the shade.
After addressing these immediate dangers, assess whether evacuation is necessary.
When and How to Evacuate
If a life-threatening condition is identified, act quickly to plan an evacuation. Situations like severe fractures, deep wounds, head or spinal injuries, heart attacks, strokes, or anaphylaxis require immediate action. Todd Mullenix, Director of Wilderness Medicine Education at NCOAE, advises:
He who hesitates is lost.
Don’t wait to call for help – emergency systems need time to respond.
Since cell coverage can be unreliable in remote areas, text messages might work better than voice calls. It’s also wise to carry a Personal Locator Beacon (PLB) or a satellite communicator like an InReach as a backup. Always leave a detailed trip plan with someone who isn’t on the trip. This information can be vital for search and rescue teams.
If electronics fail, you may need to get creative. Send two runners to find a signal, or use tools like a whistle, mirror, or even a signal fire to attract attention. In one Yosemite case, a hiker suffering from heat stroke with a temperature over 104°F couldn’t be airlifted due to high-altitude conditions. Ground transport to a lower elevation became the only option.
Recording Incident Information
Keeping detailed records of the incident can be a lifesaver for emergency responders. Use the SOAP format:
- Subjective: Patient complaints, how the injury happened, GPS location, age, and gender.
- Objective: Physical exam findings, position, and vital signs.
- Assessment: Your diagnosis or observations.
- Plan: What treatments you provided and your evacuation strategy.
This structured approach ensures responders know what’s been done, minimizing gaps in care.
Conclusion
Preparation is everything when it comes to wilderness first aid. From assembling the right gear to mastering injury care and evacuation techniques, being ready can make all the difference when you’re far from immediate help. Poor cell service, unpredictable weather, and limited resources mean you need to be able to act effectively, even if help is hours – or days – away.
Training is just as important as having the right equipment. As Ken Knapp, REI Editor Emeritus, puts it:
Safety is your responsibility.
Taking courses like Wilderness First Aid (WFA) or Wilderness First Responder (WFR) equips you with the skills to assess patients systematically, make life-saving evacuation calls, and stay composed in high-pressure situations. Together, proper training and essential gear create the backbone of any solid backcountry safety plan.
Don’t forget the 10 Essentials, but tailor them to your specific adventure. The National Park Service advises:
The 10 Essentials are only the basic items you should have with you. You may need additional items depending on the activity.
For instance, pack extra moleskin for blister care during long hikes or hydration salts if you’re trekking through desert terrain. A well-thought-out kit can help you address the unique challenges of your environment.
Prevention is always better than treatment. File a trip plan, check the weather, and know your limits. Stay vigilant about hygiene, purify your water (boiling for 3 minutes at elevations over 6,500 feet), and keep a safe distance from wildlife.
Being prepared not only boosts your confidence but also ensures you can handle the unexpected. With the right training, equipment, and mindset, you’ll be ready to navigate emergencies and fully enjoy the incredible beauty of the wilderness.
FAQs
How do I decide between taking a Wilderness First Aid or Wilderness First Responder course?
Choosing between a Wilderness First Aid (WFA) and a Wilderness First Responder (WFR) course comes down to your level of experience, the nature of your outdoor activities, and how prepared you want to be in emergencies.
The WFA course is a great fit for casual hikers, campers, or outdoor enthusiasts looking to learn basic first aid skills. It typically requires 16–20 hours of training and focuses on essential topics like treating minor injuries and managing common outdoor emergencies.
On the other hand, the WFR course is much more in-depth and tailored for outdoor guides, rescue personnel, or anyone spending extended periods in remote areas. This training spans about 80 hours and covers advanced medical techniques, trauma care, and handling emergencies over longer durations.
For recreational hikers, the WFA course often provides sufficient preparation. But if you lead groups or venture deep into the wilderness, the comprehensive training offered by WFR is the better choice.
How do I adjust my first aid kit for different hiking conditions?
To get your first aid kit ready for hiking, think about the specific challenges of your environment, how long you’ll be out, and how many people are in your group. In remote areas, be sure to pack items like trauma shears, tweezers, waterproof bandages, and supplies to handle fractures or blisters. If you’re heading to places where insect bites or poisonous plants are a concern, include hydrocortisone cream, antiseptic ointment, and antihistamines.
For cold or wet conditions, thermal blankets and extra waterproof dressings are smart additions. In hot, dry climates, prioritize hydration with electrolyte tablets, along with sun protection items like sunscreen and lip balm. Take time to familiarize yourself with the contents of your kit, and consider a wilderness first aid course to build confidence in using it when needed.
What should I do if someone has a medical emergency while hiking in a national park?
If you encounter a medical emergency on a hike, the first thing to do is ensure the area is safe for both you and others. Once you’re certain there’s no immediate danger, assess the injured person’s condition by checking their airway, breathing, and circulation – commonly referred to as the ABCs. Also, check for any serious injuries, such as heavy bleeding or symptoms of shock.
If the individual is conscious, always ask for their permission before offering assistance. If there’s any chance of a neck or back injury, stabilize their spine carefully to prevent further harm. Address any life-threatening issues right away, and keep a close eye on their condition. In remote areas, medical help might take a while to arrive, so be ready to call for assistance or arrange an evacuation if necessary.
Preparation is key for managing emergencies on the trail. Carry essential safety gear like a first aid kit, whistle, and signal mirror, and consider taking a wilderness first aid course to build your skills. Filing a trip plan before heading out can also make a big difference in ensuring help can find you quickly if needed.