
Rooftop tents (RTTs) transform your vehicle into an elevated sleeping space, keeping you off the ground and away from insects or wildlife. They’re ideal for outdoor enthusiasts, offering convenience, comfort, and mobility for overlanding adventures. This guide breaks down the three main types of RTTs – hardshell, softshell, and hybrid – along with tips on vehicle compatibility, installation, and maintenance.
Key Takeaways:
- Types of RTTs:
- Hardshell: Quick setup (under 60 seconds), durable, better aerodynamics, costs $2,400–$4,500+.
- Softshell: Budget-friendly ($1,000–$1,500), more space, but slower setup (3–5 minutes).
- Hybrid: Combines hardshell durability with softshell space, priced $3,000–$4,500+.
- Vehicle Compatibility: Check dynamic (while driving) and static (while parked) load capacities. SUVs generally support 150–165 lbs dynamically and 200–250 lbs statically.
- Roof Racks: Upgrade to aftermarket crossbars or platform racks for stability. Costs range from $400 to $3,500+.
- Features to Look For: Waterproofing (2,000–3,500 mm PU coating), ventilation, quick setup, and appropriate weight for your vehicle.
- Maintenance: Clean after trips, inspect for wear, and store properly during the off-season.
Rooftop tents simplify camping, save interior space, and offer a cozy way to explore remote destinations. Whether you choose a hardshell for speed or a softshell for space, the right RTT can elevate your overlanding experience.
Rooftop Tent Buying Guide: What You Need to Know
sbb-itb-00512f3
Types of Rooftop Tents
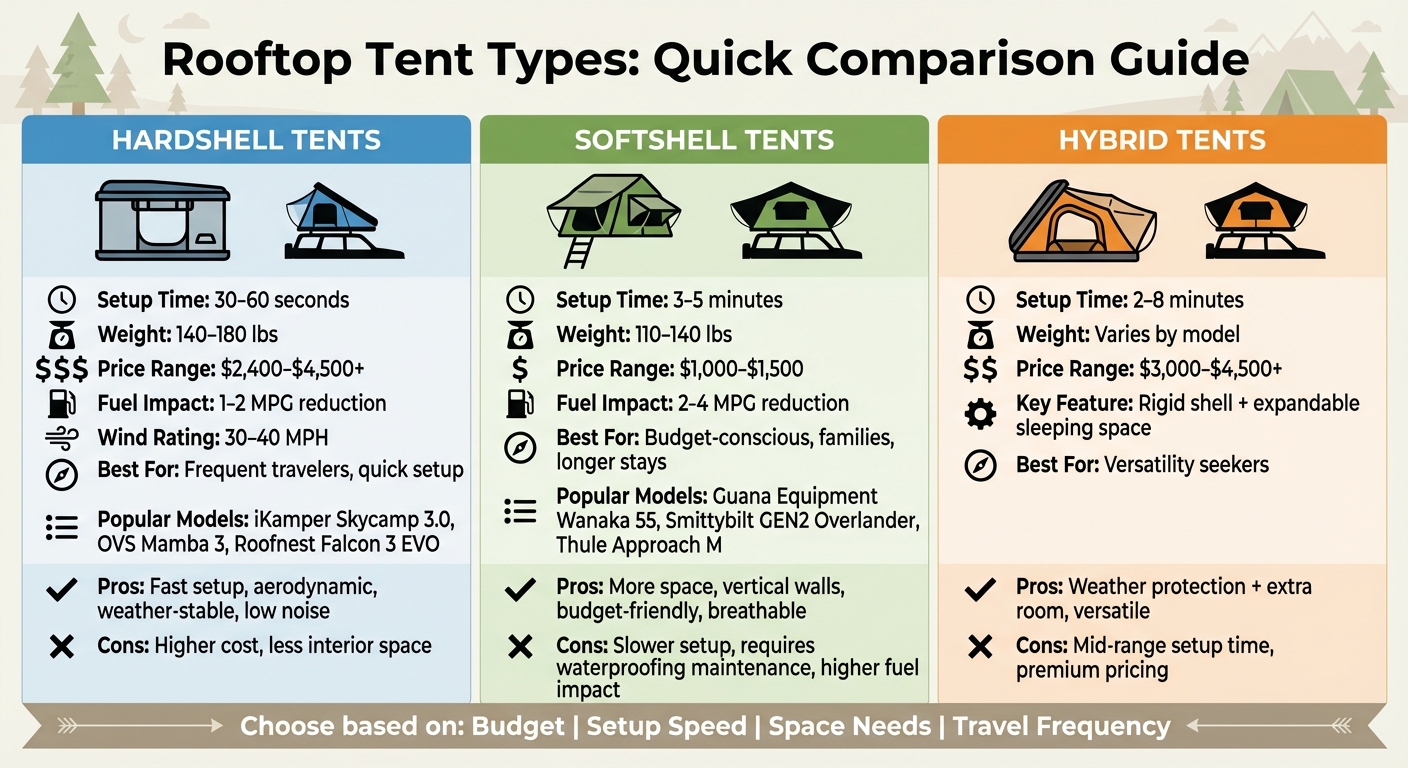
Rooftop Tent Types Comparison: Hardshell vs Softshell vs Hybrid
Rooftop tents come in three main types: hardshell, softshell, and hybrid. Each one caters to different overlanding needs, so understanding their features can help you pick the best fit for your adventures. Let’s break down what makes each type unique.
Hardshell Rooftop Tents
Hardshell tents are built with rigid panels made from materials like ABS plastic, aluminum, or fiberglass, and they open using gas-assisted struts. Popular models include the iKamper Skycamp 3.0 and OVS Mamba 3. These tents are all about speed and convenience, setting up in just 30–60 seconds. If you’re arriving late to camp or moving frequently, that quick setup can be a game-changer.
Another advantage is their low-profile design, which improves aerodynamics and helps with fuel efficiency. Hardshell tents typically reduce fuel economy by only 1–2 MPG at highway speeds, saving around 15–30 gallons of fuel over a 2,000-mile trip. They also shine in tough weather conditions, offering stability and reduced noise in winds up to 30–40 MPH, a significant edge over fabric-based softshell tents. The Roofnest Falcon 3 EVO, for example, is rated 84/100 for its aerodynamic efficiency. Most hardshell models weigh between 140 and 180 lbs and cost between $2,400 and $4,500+.
Softshell Rooftop Tents
Softshell tents use a collapsible fabric design, supported by an internal frame, and are protected by a PVC cover when packed. Examples like the Guana Equipment Wanaka 55 and Smittybilt GEN2 Overlander highlight the category’s strengths. While setup takes a bit longer – around 3–5 minutes – these tents provide more interior space, thanks to their nearly vertical walls.
Softshells are lighter, typically weighing 110–140 lbs, and are more budget-friendly, with prices starting from $1,000 to $1,500. The Smittybilt GEN2 Overlander is a standout for its 360-degree rainfly coverage and built-in LED lighting, earning it the title of "Best Bang for the Buck". Another noteworthy model, the Thule Approach M, rated 81/100, offers extra headroom with its unique four-pole structure. Softshell tents perform well in warm, humid climates due to their breathable poly-cotton canvas, which helps manage condensation. However, they do have some drawbacks: they can reduce fuel economy by 2–4 MPG and require regular waterproofing and drying to prevent mildew.
Hybrid Rooftop Tents
Hybrid tents combine features from both hardshell and softshell designs. They have a rigid outer shell for weather protection, but they fold out to create extra sleeping space, offering the best of both worlds. Depending on the model, setup times range from 2–8 minutes. This makes hybrids a versatile choice for those who want quick deployment without sacrificing roominess. Premium hybrid tents are priced between $3,000 and $4,500+.
Once you’ve figured out the right tent for your needs, the next step is ensuring it matches your vehicle’s roof rack.
Vehicle Compatibility and Roof Rack Requirements
Before mounting a rooftop tent, it’s crucial to ensure your vehicle can handle the added weight. Interestingly, the roof structure of your vehicle is rarely the issue – it’s usually the roof rack that determines whether your setup is safe and functional.
Static vs. Dynamic Load Capacities
When evaluating compatibility, you need to understand two important weight ratings: dynamic load capacity and static load capacity.
- Dynamic Load Capacity: This measures the maximum weight your roof can handle while the vehicle is in motion. It accounts for forces like braking, cornering, and bumps in the road [13,15]. If your tent’s closed weight exceeds this limit, it’s unsafe to transport [12,15].
- Static Load Capacity: This refers to the weight your roof can support when the vehicle is parked on level ground. It includes the combined weight of the tent, roof rack, and occupants. Static capacity is much higher – typically 2 to 5 times the dynamic capacity – because the weight is distributed across the vehicle’s frame, often with extra support from the tent’s ladder [13,14].
Here’s a quick guide to typical load capacities for different vehicles:
| Vehicle Type | Dynamic Load Range | Static Load Range |
|---|---|---|
| Compact Cars | 75–110 lbs | 150–200 lbs |
| Mid-size Sedans | 100–130 lbs | 175–220 lbs |
| SUVs | 150–165 lbs | 200–250 lbs |
| Pickup Trucks (Roof) | 120–200 lbs | 300–400 lbs |
| Large SUVs/Vans | 160–220 lbs | 250–350 lbs |
To determine your vehicle’s specific limits, check the owner’s manual under "Roof Load Capacity" or look for the vehicle identification plate in the driver’s door frame [13,14]. Don’t forget to subtract the weight of your roof rack – usually around 44 lbs – from the total capacity to figure out how much weight is left for your tent.
Selecting a Roof Rack
Not all roof racks are created equal, and choosing the right one is essential for safety and performance. Factory-installed plastic crossbars are generally unsuitable for rooftop tents, especially heavier hardshell models [12,14]. Most OEM racks only support a dynamic load of 75–165 lbs, which doesn’t work for many tents. Upgrading to an aftermarket system is often necessary.
- Aftermarket Crossbars: Brands like Thule and Yakima offer crossbars with dynamic load capacities of 150–220 lbs, making them a solid choice for 2–3 person softshell tents. Proper spacing – about 35–38 inches apart – is key to preventing flex and ensuring adequate support.
- Full Platform Racks: These distribute weight across multiple mounting points and can handle dynamic loads of 220–330+ lbs. They’re ideal for hardshell tents and heavier setups [12,15].
- Truck Bed Racks: For pickup owners, bed racks provide the highest capacity, often supporting 300–800+ lbs dynamically and virtually unlimited static loads [12,14].
Pricing Overview:
- Crossbars: $400–$1,200
- Platform Racks: $400–$3,500+
- Truck Bed Racks: $1,000–$3,500+
When driving with a rooftop tent installed, reduce your highway speed by 5–10 mph and stay aware of your vehicle’s raised center of gravity. This adjustment helps manage the impact on cornering and braking.
Next, we’ll dive into the key features to look for when selecting a rooftop tent.
Key Features to Look for in a Rooftop Tent
Once you’ve confirmed your vehicle can handle a rooftop tent, it’s time to focus on the features that can make or break your camping experience. Factors like weather resistance, ease of setup, and the right size are crucial for ensuring your trips are as comfortable and stress-free as possible. These details can transform your overlanding adventures into a seamless and enjoyable experience.
Weather Protection and Airflow
Keeping dry and managing condensation are non-negotiable when it comes to rooftop tents. Materials like 600D ripstop polyester or poly-cotton blends are ideal. While poly-cotton offers better breathability to combat condensation, polyester is lighter and easier to handle. For waterproofing, look for a polyurethane (PU) coating with a rating between 2,000 mm and 3,500 mm – this ensures the tent can withstand heavy rain.
Hardshell models often use sturdy materials like aluminum honeycomb panels, ABS plastic, or fiberglass, which not only improve durability but also provide excellent insulation. To keep condensation in check, features like multiple mesh windows for cross-ventilation, adjustable roof vents, and anti-condensation mats under the mattress are essential. Window awnings are another great addition, allowing you to maintain airflow during rain without turning the tent into a sauna. These ventilation options are especially useful for multi-day trips in humid conditions.
"Look for rooftop tents with mesh windows and ventilation flaps that can be opened or closed as needed. This feature helps prevent condensation and maintains a comfortable sleeping environment."
Setup Speed and Convenience
After a long drive – or when bad weather strikes – you’ll appreciate a tent that sets up quickly. Hardshell tents with gas-strut mechanisms are a standout here, as they can pop open in under a minute. All it takes is unlatching a few clips and lifting the tent. Softshell designs, on the other hand, involve unzipping the cover, unfolding the base, extending poles, and securing guy lines. With some practice, this process usually takes 3 to 5 minutes.
One big advantage of many hardshell tents is that you can leave your bedding, pillows, and even some gear inside when the tent is closed. This feature is a game-changer if you’re moving camp frequently, saving both time and effort.
"If you dread setup after a long drive, lean toward simpler designs [hardshells]."
- Reed Hopper, Artemis Outdoor
Weight and Sleeping Capacity
Rooftop tents generally weigh between 100 and 250 pounds. Hardshell models are on the heavier side (150–250 lbs) because of their rigid construction, while softshell tents are lighter, typically falling between 100 and 185 pounds.
When it comes to sleeping space, a standard 2-person tent is about 55 inches wide, offering roughly 28 inches of sleeping space per person. If you need more room – for extra gear, a pet, or just a more comfortable night’s sleep – consider upgrading to a 3-person tent. Families should pay special attention to the tent’s interior dimensions. While some softshell models can expand to sleep up to five people, hardshell tents are usually limited to 2–3 occupants.
Installation and Maintenance
Ensuring proper installation and regular maintenance is key to keeping your rooftop tent safe and extending its lifespan, which typically ranges from 5 to 15 years. These steps go hand-in-hand with the compatibility and features we covered earlier.
How to Install a Rooftop Tent
Start by unboxing your tent on a flat surface, checking for any damage or missing components like bolts, spring rods, or mounting plates. Gather the tools you’ll need: a metric socket set, ratchet, torque wrench, cordless drill, and ladder. To protect your roof rack bars, lay down some blankets before you begin.
Most rooftop tents attach using sliding bolts and mounting plates that clamp onto your vehicle’s crossbars. Carefully lift the tent onto the roof – if you’re working solo, loosely attach the mounting feet first, then climb inside the tent to tighten the bolts. Double-check that the tent is centered before you secure everything. Use a torque wrench to tighten the bolts according to the manufacturer’s specifications.
"Always prioritize safe and proper tent installation over speed." – BeneJason, Benehike
Once the tent is mounted, fully open it to inspect the poles, zippers, and hinges. Before every trip, take a moment to check the roof rack bars, legs, and mounts for any cracks or other damage.
Routine inspections and cleaning will ensure your tent stays in top condition.
Cleaning and Inspection
After each adventure, start by removing any bedding and vacuuming the mattress. Sprinkle baking soda to neutralize odors, then vacuum again. Use a dry microfiber cloth to clear away loose debris from interior panels, followed by a damp cloth for deeper cleaning. Stick to mild soap and warm water – harsh chemicals can harm the fabric.
If you spot mold or mildew, treat the area with white vinegar, let it dry, and repeat if necessary. Never store your tent while it’s damp, as this can lead to mold, bacterial growth, and even pests. Regularly inspect the fabric for tears or holes, and check the hardware – like zippers, poles, hinges, buckles, and mounting bolts – for signs of wear. For zippers that stick, a little lubrication can make a big difference.
"Maintaining a rooftop tent is much easier than caring for traditional tents. After all, they stay clean much longer since they don’t make contact with the ground." – Super Pacific
Once your tent is clean and inspected, focus on proper storage to protect it during the off-season.
Off-Season Storage
Removing your tent during the off-season not only protects it but also improves fuel economy and reduces wear. Before storing, give it a thorough cleaning. Wash mattress covers (but avoid washing the foam), wipe down the interior frame, and scrub the exterior shell. Clean zipper teeth with a soft brush, apply lubricant, and spray dry silicone on telescopic ladders and support poles.
Store your tent in a dry, shaded area like a garage or basement to prevent mold, rot, and pests. Avoid placing it directly on concrete – use a platform made of 2×4 wood sections or pool noodles to create a buffer. Wrap the tent in a mattress bag or thick moving blankets, sealing it with duct tape for added protection.
"Proper storage protects your investment, ensuring that it is free of degradation and other conditions that will compromise its durability." – Russ Hennings, Tuff Stuff Overland
Ceiling hoists are a great option for saving floor space and making reinstallation easier. If you choose to lean the tent against a wall, secure it with straps to prevent tipping. Before storing, inspect mounting brackets, bolts, and gas struts for any wear or corrosion to ensure everything is in good shape when you’re ready to use it again.
Conclusion
This guide has covered everything you need to know to select, install, and care for your rooftop tent.
Rooftop tents take overlanding to the next level by combining comfort and convenience. Whether you’re exploring Utah’s rugged desert parks or camping in Arizona’s stunning canyons, an RTT keeps you elevated – away from mud, bugs, and wildlife – while offering a secure and cozy sleeping space wherever your vehicle takes you.
Choosing the best tent depends on your priorities. Hardshell tents are ideal for frequent travelers, thanks to their quick setup (some in under 60 seconds) and better aerodynamics. On the other hand, softshell tents are perfect for families or longer stays, offering more room at a lower cost. Don’t forget to check your vehicle’s dynamic weight capacity, which for most SUVs and trucks ranges between 100 and 200 pounds. Pair your tent with a compatible roof rack system to ensure safety both on the road and at camp. With this knowledge, you’re ready to pick a rooftop tent that suits your adventures.
"A loved, well-chosen, and well-maintained tent will help you travel to the ends of the earth and back in relative comfort." – Graeme Bell, Author and Explorer
Once installed correctly, maintaining your tent is straightforward. Keep it dry, inspect the hardware regularly, and store it properly. With prices starting around $1,000 for basic softshell models and exceeding $4,500 for premium hardshells, proper care can extend the lifespan of a softshell tent to about 5 years and a hardshell tent to 10–15 years.
Whether you’re planning a weekend escape to a national park or a longer overlanding journey, a rooftop tent simplifies your setup, saves space in your vehicle, and enhances your outdoor experience. Just pick the right size, ensure a waterproof rating of at least 2,000 mm, and always park on level ground.
FAQs
Can my vehicle safely carry a rooftop tent?
Your vehicle can handle a rooftop tent, but only if the roof rack is up to the task. The dynamic load capacity is key while you’re driving, as it indicates how much weight the rack can safely bear in motion. On the other hand, the static load capacity comes into play when the vehicle is parked, showing how much weight the rack can hold without movement. Always double-check the roof rack’s weight limits and install everything correctly to ensure your overlanding trips are both safe and worry-free.
How do I calculate dynamic vs. static roof load?
To figure out the difference between dynamic and static roof load, start by checking two key things: your vehicle’s roof load limit and the rating of your roof rack.
- Static load refers to the maximum weight your car’s roof can handle while it’s parked. This includes the weight of things like a rooftop tent and any gear inside it.
- Dynamic load, on the other hand, accounts for the forces at play when you’re driving – think about the impact of bumps, turns, and stops.
Make sure the total weight of your tent, gear, and any other load stays within these limits to ensure safe usage.
Do I need crossbars or a full platform rack?
When deciding between crossbars and a full platform rack, it largely comes down to your vehicle and rooftop tent setup. For most rooftop tents, crossbars are enough – provided they are spaced at least 30 inches apart and can handle the tent’s weight. However, if you need a broader base for additional gear or have a roof type that requires specific configurations, a full platform rack might be the better choice.