
Want to experience nature like never before? Night wildlife observation opens the door to a hidden world of nocturnal creatures and their fascinating behaviors. From owls and bats to elusive predators, the night is alive with activity you can’t see during the day. Here’s what you need to know:
- Plan smart: Choose dark, biodiverse locations like national parks with minimal light pollution. Tools like iNaturalist can help pinpoint species in your area.
- Timing matters: Animals like owls and bats are most active during specific seasons and hours. Check moon phases and weather for better chances.
- Gear essentials: Use night vision or thermal imaging for spotting animals without disturbing them. Red-light headlamps preserve your night vision and avoid startling wildlife.
- Stay safe: Stick to marked trails, carry extra batteries, and dress for changing temperatures. Always maintain a safe distance from animals.
- Observe responsibly: Avoid loud noises, keep lights dim, and never feed wildlife to ensure their safety and yours.
With the right preparation and tools, you can safely enjoy the wonders of nocturnal wildlife while minimizing your impact on their habitat. Ready to dive into the details? Let’s go.
Bird Watching at Night: Thermal, Night Vision and Spotlighting
sbb-itb-00512f3
Planning Your Night Observation Trip
When planning a night observation trip, aim for places with minimal light pollution. National parks with Dark Sky International certifications are excellent choices, offering better conditions for observing nocturnal wildlife. Tools like iNaturalist or the National Moth Recording Scheme can help identify recent sightings and pinpoint where specific species have been spotted in your area. For up-to-date park details and local advice, check resources like The National Park Guide.
Finding the Best Observation Locations
Research is key to finding the right spot. Parks with high biodiversity density are great starting points – species density reports can highlight areas with concentrated wildlife activity. Keep in mind that different species prefer different habitats. For example:
- Great Horned Owls thrive in open areas near mature forests.
- Barred Owls are commonly found in dense deciduous forests near water.
If you’re interested in Brazilian free-tail bats, Carlsbad Caverns National Park is a must-visit, as it offers a spectacular bat emergence at sunset from April through mid-October. Before heading out, scout your chosen location during the day. This will help you identify safe parking areas, access points, and key habitat features like water edges or snags. Once you’ve picked your spot, plan your visit around the species’ peak activity times.
When to Go: Timing and Seasons
Timing is as important as location. In North America, different seasons bring out different species:
- March through April: Owls and woodcocks are most active.
- May through July: Nightjars, rails, and bitterns dominate the scene.
Species like the Northern Saw-whet Owl are particularly vocal about two hours after sunset during calm spring evenings. Moon phases can also influence activity. For example, Eastern Whip-poor-wills and Chuck-will’s-widows are most vocal when the moon is at least half-full. Additionally, low wind conditions improve sound detection, and warmer temperatures often amplify calls. For insect enthusiasts, the best time is during dark nights with little moonlight and high humidity. Once you’ve nailed the timing, it’s crucial to understand the behaviors of your target species.
Understanding Animal Behavior
To make the most of your trip, familiarize yourself with species-specific behaviors. Since visual sightings can be rare at night, learning to identify animals by their calls is essential. For instance:
- The American Woodcock makes a distinctive "peent" sound.
- The Barred Owl is known for its "who-cooks-for-you" call.
According to eBird, a nocturnal checklist typically starts 20 minutes after sunset and ends 40 minutes before sunrise. Environmental factors also play a role. Eastern Screech-Owls, for example, are more active during full moons and just before storms, while American Bitterns call less frequently under heavy cloud cover. Tools like eBird’s "Effort Map" can help you identify observation gaps and contribute valuable data during your outings.
Equipment You’ll Need
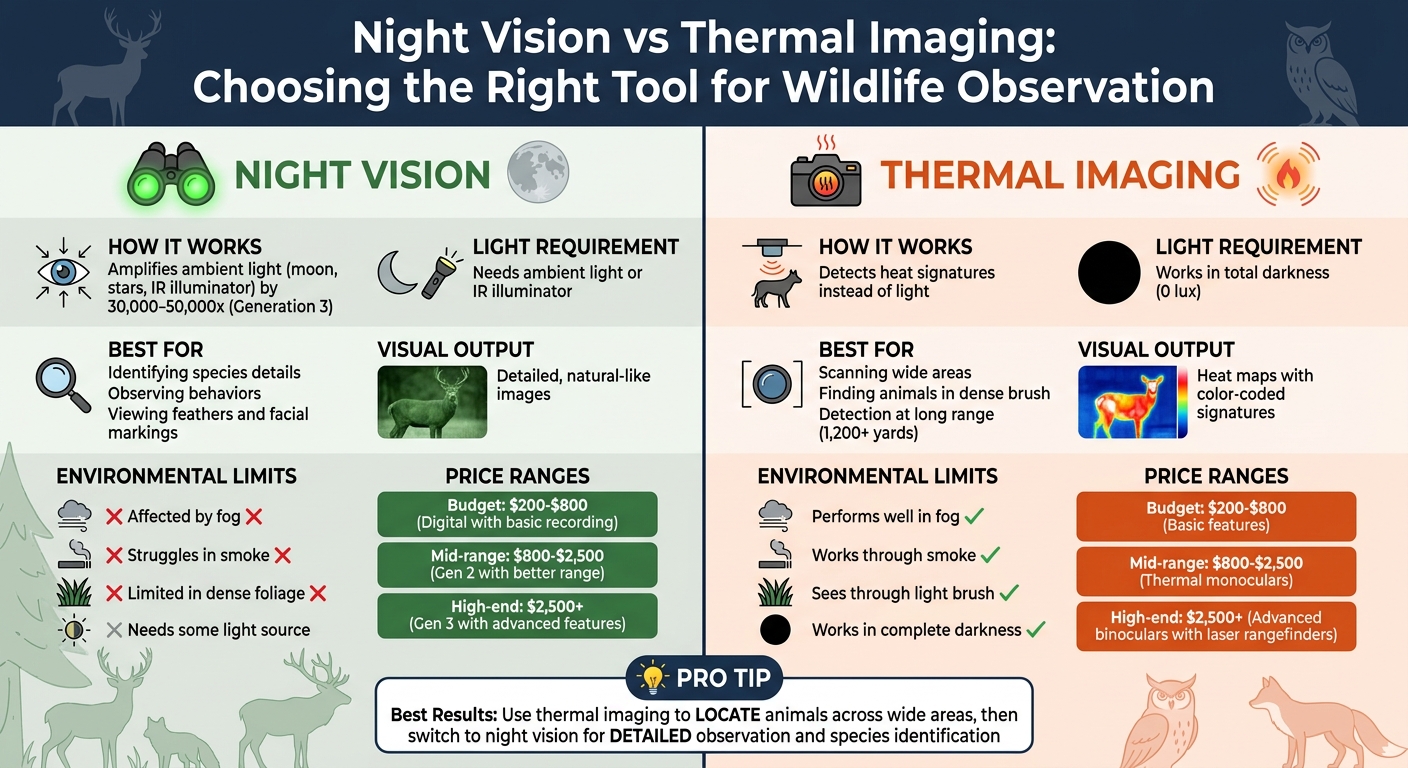
Night Vision vs Thermal Imaging for Wildlife Observation
Having the right gear can make a huge difference when it comes to observing wildlife at night. It not only improves your ability to spot and identify animals but also ensures you can do so without causing unnecessary disturbance. Here’s a breakdown of the essential tools and their uses.
Night Vision and Thermal Imaging Tools
Night vision works by amplifying available light – whether it’s from the moon, stars, or an infrared illuminator – to create a detailed image. Generation 3 devices, for example, can amplify ambient light by an impressive 30,000 to 50,000 times. These are great for spotting fine details like feathers or facial markings. Modern digital night vision is also highly sensitive, but it does have its limits. Fog, heavy rain, or total darkness without an IR illuminator can reduce its effectiveness.
Thermal imaging, on the other hand, detects heat rather than light. This allows it to work in conditions where night vision might fail, such as through smoke, fog, or dense foliage. As Miles Everett explains:
Complete darkness, bright sunlight, smoke, or fog – thermal cameras see heat signatures through it all
. Thermal devices are perfect for scanning large areas or finding animals hidden in thick vegetation. For example, the Hawkeye AI15 thermal monocular can detect heat signatures over 1,200 yards away. However, thermal imaging doesn’t provide the fine detail that night vision does.
| Feature | Night Vision | Thermal Imaging |
|---|---|---|
| Light Requirement | Needs ambient light or IR illuminator | Works in total darkness (0 lux) |
| Best For | Identifying species and behaviors | Scanning wide areas or dense brush |
| Visual Output | Detailed, natural-like images | Heat maps with color-coded signatures |
| Environmental Limits | Affected by fog, smoke, and dense foliage | Performs well in fog and light brush |
When it comes to cost, you have options:
- Budget-friendly ($200–$800): Digital night vision with basic recording features.
- Mid-range ($800–$2,500): Generation 2 night vision or thermal monoculars with better range and resolution.
- High-end ($2,500+): Generation 3 night vision or advanced thermal binoculars with features like laser rangefinders and livestreaming.
For the best results, use thermal imaging to locate animals over a wide area, then switch to night vision for detailed observation. Bird watchers, in particular, will benefit from digital night vision with at least 1080p resolution and 4–6x magnification for identifying species and plumage.
Once your imaging needs are sorted, you’ll need proper lighting to round out your setup.
Proper Lighting for Night Observation
Red-light headlamps are the go-to choice for night observation. Red light is less disruptive to wildlife and helps preserve your own night vision. Most nocturnal animals aren’t sensitive to red wavelengths, so you can use this type of light to read maps, adjust gear, or move around without startling them – or ruining your own ability to see in the dark.
When using any light, keep it dim and avoid shining it directly at animals to minimize stress. For navigating between observation points, a red-light filtered headlamp provides safe mobility while maintaining your night vision.
If you’re using night vision gear, consider adding an IR flashlight to extend its range. The Nightfox XB5 850nm Infrared Flashlight, priced at $49.99, is a solid budget-friendly option.
Additional Gear and Accessories
To make the most of your observation sessions, a few extra tools can go a long way:
- Tripods: Essential for stabilizing high-magnification optics (8x or higher). Options include adjustable mini tripods or flexible models that can wrap around branches.
- Binoculars with image stabilization: Models like the Kite APC series use gimbals and software to provide steady views, even without a tripod.
- Power solutions: Cold temperatures can drain batteries by 20–40%. Bring spare batteries and keep them warm in your inner pockets. A waterproof power bank, like the Klarus K5, ensures your devices stay charged throughout the night.
- Field documentation tools: Waterproof clipboards are great for taking notes in damp conditions, while binocular harnesses keep your optics accessible without straining your neck during long sessions.
- Recording features: Many modern night vision and thermal devices come with Wi-Fi, internal storage, and 4K video capabilities, allowing you to document wildlife behavior quietly and effectively.
With the right mix of imaging tools, lighting, and accessories, you’re set for a successful and low-impact wildlife observation experience.
Observing Wildlife Responsibly
When it comes to watching nocturnal animals, it’s crucial to tread carefully. The National Park Service puts it plainly: "In general, if animals react to your presence you are too close". If an animal pauses its natural behavior to focus on you, it’s a clear sign to step back immediately.
Keeping a Safe Distance
The distance you should maintain depends on the animal’s size and temperament. Here are some general guidelines:
- Small animals (like squirrels): Stay at least 25 yards away (about two school bus lengths).
- Larger herbivores (like deer or elk): Keep a distance of 50 yards (four bus lengths).
- Predators (like bears or wolves): Maintain at least 100 yards (eight bus lengths).
Some parks, like Olympic National Park, enforce stricter rules, requiring 50 yards for all wildlife.
A simple trick to gauge your distance is to extend your arm and check if your thumb completely covers the animal. If it doesn’t, you’re too close. And if you’re close enough to snap a selfie, you’re way too close – use a zoom lens or binoculars instead.
Reducing Your Impact
Nocturnal animals are incredibly sensitive to their surroundings. For example, amphibians can detect light levels up to 100 times dimmer than humans can, and fennec foxes rely on their sharp hearing to navigate the dark. This heightened sensitivity means even small disturbances can have a big effect.
To minimize your impact:
- Keep noise levels low. Avoid using wildlife calls or bird calls, as these can stress or confuse animals during their active hours.
- Manage your lighting. Artificial light disrupts nocturnal wildlife in surprising ways. It can disorient migratory birds, mislead sea turtle hatchlings toward roads instead of the ocean, and even affect zooplankton, throwing off entire ecosystems. Use red-light headlamps and dim lighting with motion sensors when necessary.
- Stick to trails. Staying on designated paths helps animals feel safer, as they’re less likely to be startled by humans in expected areas.
- Don’t feed wildlife. Feeding animals can make them associate humans with food, leading to aggressive behavior. Always store food and trash in wildlife-resistant containers.
Reading Animal Stress Signals
Animals often show signs of distress through behavioral changes. If an animal stops what it’s doing to stare at you, alters its movements, or starts moving away, it’s time to back off. As the National Park Service explains, "The best viewing experiences happen when the animals act naturally, without being distracted by a human presence or interference".
If an animal acts unusually bold or approaches you, move away immediately and inform park rangers. This behavior could indicate illness or that the animal has become too accustomed to humans, which can be dangerous for both the animal and visitors. Keeping wildlife wild is essential for everyone’s safety.
Staying Safe at Night
Observing wildlife at night requires careful attention to safety. The darkness brings unique challenges, from navigating tricky terrain to dealing with sudden temperature drops. Being prepared is key. These tips build on the equipment and ethical practices discussed earlier.
Moving Safely in the Dark
It takes 20–30 minutes for your eyes to fully adjust to the dark. Any exposure to white light will reset this process, so stick to red light for tasks like reading maps or adjusting your gear. Red light preserves your night vision while providing enough brightness to see. When scanning your surroundings, look slightly off-center. This technique uses your peripheral vision, which relies on rod cells – these are much more effective in low light than the cone cells in the center of your vision.
Slow down your pace by 25–50% since depth perception is reduced at night. A trail that takes two hours during the day might stretch to three hours after dark. For better visibility, wear your headlamp at waist level or use an adjustable mount. This setup enhances shadows, making trail contours and obstacles easier to spot. Trails often appear as darker lines against lighter terrain – look for this "trough" effect to stay on course.
Navigation at night relies heavily on tools rather than visual landmarks. Equip yourself with a GPS device loaded with offline topographic maps, a luminous-dial compass, and stick to well-marked trails. Avoid tricky terrain, loose rocks, or scrambling unless you’re already familiar with the route in the dark.
Once you’ve planned your movement strategy, turn your attention to preparing for unexpected situations.
Preparing for Emergencies
Before heading out, leave a detailed trip plan with someone at home. Include your route and expected return time – this information is vital for Search and Rescue if needed. The National Park Service cautions against using cell phones as light sources, as their batteries drain quickly when used as flashlights. Reserve your phone’s battery for emergency calls.
Always carry multiple light sources. A primary headlamp with at least 300 lumens for standard trails (or 500 lumens for technical terrain) is essential, along with backup flashlights. Pack extra batteries, as high-output modes deplete power faster than expected. Most high-powered headlamps only last 2–4 hours on maximum brightness.
Temperature control is critical. Expect a 3–5°F drop for every 1,000 feet of elevation gain. Dress in three layers: a moisture-wicking base layer (wool or synthetic), an insulating middle layer, and a waterproof outer shell. This system helps prevent hypothermia. Spring and fall are particularly risky times, as many underestimate how early it gets dark.
Now, let’s look at how to use your lights effectively in emergencies.
Using Light Responsibly in Emergencies
In emergencies, prioritize safety while being mindful of your surroundings. Keep your lights dim and narrow the beam by partially covering the lens with your fingers. This minimizes disturbance and helps preserve your night vision. When crossing safe, open ground, try to rely on moonlight instead of artificial light.
If you need to signal for help, use the international distress signal: three flashes of light repeated at regular intervals. Keep in mind that spotlighting wildlife is prohibited in national parks under 36 CFR 2.2(e). Focus your lights on navigation and personal safety, avoiding unnecessary disruptions to the environment.
Finding and Identifying Nocturnal Animals
With your safety taken care of, it’s time to dive into the main event – spotting the fascinating creatures that come alive after dark. U.S. national parks are teeming with nocturnal wildlife, from tiny bats to larger predators. Knowing what to look for, when to look, and how to use your equipment effectively can make all the difference in your nighttime adventure.
Nocturnal Species by Region
National parks host a wide array of nighttime animals. Among mammals, you might encounter the Virginia opossum, easily identified by its pointed nose and hairless tail, as well as raccoons, ringtails, and various bat species like the Big Brown, Hoary, and Red bats. Depending on the region, you could also spot foxes, mountain lions, and black bears. The nine-banded armadillo, with its distinctive armored plates, is another unique nocturnal resident.
Birds are equally active at night. The Great Horned Owl, Barred Owl (famous for its "Who cooks for you?" call), and Eastern Screech-owl (known for its descending, quavering whinny) are common nighttime sounds. Nightjars, such as the Common Nighthawk, also contribute to the nocturnal soundscape.
Bats deserve special mention – not only for their erratic zigzag flight that sets them apart from birds but also for their role in pest control. A single bat can eat 1,000 to 3,000 mosquito-sized insects in one night, offering an economic benefit estimated between $3.7 billion and $53 billion annually. Predators like foxes and mountain lions often have a reflective layer in their eyes, called the tapetum lucidum, which creates eyeshine and helps with identification in the dark. For scorpion enthusiasts, a black light is essential, as their exoskeletons fluoresce under UV light. Amphibians, on the other hand, have incredibly sensitive vision, detecting light levels up to 100 times dimmer than human eyes.
Activity Patterns and Peak Hours
Timing is everything when it comes to spotting nocturnal animals. Some creatures, known as crepuscular animals – like deer, rabbits, and javelina – are most active during dawn and dusk. Meanwhile, species like owls and bats stick to strictly nighttime schedules. For the best chances of seeing bats and screech owls, plan your outings during the "blue hour", just after sunset or before dawn.
Temperature also plays a big role in animal activity. In warmer areas like Arizona, animals that are usually active during the day or twilight – such as snakes and bears – may shift to nighttime activity to avoid the heat. Snakes, for instance, are most active when nighttime temperatures are in the 70s to 80s°F range. Similarly, black bears may adjust their routines during hotter months. Listening can also guide your search: coyotes communicate with high-pitched howls, while elk produce their distinctive "bugle" calls, especially in high-altitude parks. Even moon phases and weather conditions can influence how active animals are. Understanding these patterns can help set you up for success when using modern tools to identify wildlife.
Using Technology to Identify Wildlife
Modern technology can take your nocturnal wildlife spotting to the next level. Thermal imaging cameras are particularly effective for detecting animals in complete darkness, through dense vegetation, or even in foggy conditions. These devices can differentiate heat signatures, making it easier to spot and identify animals.
"Detection refers to knowing whether an animal is in the area… Identification, by contrast, is having a clear understanding of what you’re shooting at".
For instance, a high-end thermal device like the Thermion 2 LRF XL50 can detect heat signatures from as far as 2,515 yards, though its identification range is shorter – around 300 yards.
Night vision devices, which amplify ambient light or use infrared illuminators, provide more natural-looking images. These are particularly helpful for identifying details like feathers or facial features.
"Thermal technology essentially beats camouflage, giving you a truer picture of what’s in your environment".
Combining thermal imaging with night vision often produces the best results. Use thermal devices to locate animals, then switch to binoculars or night vision for closer inspection. Many thermal monoculars now come with Wi-Fi capabilities, allowing you to stream live footage to your smartphone for recording or sharing. Advanced sensors can deliver sharp images with resolutions up to 1,024×768 pixels. When scanning with thermal devices, move slowly to catch smaller heat signatures in dense brush. Adjusting color palettes like "White Hot", "Black Hot", or "Red Hot" can also improve contrast based on your surroundings.
With the right tools and techniques, your nocturnal wildlife experience can be both thrilling and rewarding.
Conclusion
Exploring the night wildlife in America’s national parks provides a glimpse into a world that often goes unnoticed – but it requires careful planning. After dark, human vision is limited, which increases the likelihood of accidents on uneven trails or unexpected encounters with wildlife. By selecting the right location and packing the essentials, you can lay the groundwork for a safe and rewarding experience.
Preparation goes beyond just equipment – it’s about being mindful of your surroundings. Responsible observation not only protects the environment but also enriches your experience. Reducing artificial light and maintaining quiet allows your senses to adjust, revealing the subtle sounds and sights of nocturnal life. As Karen Garthwait from Arches & Canyonlands National Parks points out, giving your eyes time to adapt to the dark can reveal the breathtaking beauty of a starry sky.
Safety should always be your top priority. Maintain a distance of at least 25 yards from smaller animals and 100 yards from predators. Always travel with a companion and make sure to share your trip plans before heading out. As the National Park Service advises:
"Ultimately, staying safe and keeping wildlife wild is up to YOU!"
FAQs
Do I need night vision or is a red headlamp enough?
A red headlamp is a solid go-to for observing wildlife at night. It helps maintain your night vision, offers safe lighting, and is less likely to startle animals compared to white light. While night vision equipment can be useful in pitch-black conditions or for getting a closer look, it’s generally not a must-have. For most situations, a red headlamp strikes the perfect balance between practicality and discretion.
How do I identify animals at night without getting too close?
At night, identifying animals from a safe distance requires careful observation of their behaviors and features. For example, owls are often identifiable by their silent flight and unique calls. Pay attention to sounds, look for movement or the reflection of glowing eyes, and consider using binoculars or a zoom lens to get a closer look without causing any disturbance. Staying quiet and keeping your distance not only ensures your safety but also helps avoid disrupting the wildlife.
What’s the safest way to avoid getting lost after dark?
To stay safe after dark, preparation is key. Stick to marked trails and avoid venturing off into unknown paths or shortcuts, especially when visibility is low. Make sure to carry reliable lighting, such as a flashlight or headlamp, to help navigate your way. Tools like a map, compass, or GPS can also be invaluable for staying on course. Additionally, knowing the park’s operating hours and planning your trip accordingly can help you avoid the risk of getting lost or stranded.