
Multi-day backpacking in national parks offers an immersive way to experience the wilderness, but it requires preparation. You’ll need the right gear, permits, and safety knowledge to ensure a successful trip. This guide covers everything from packing essentials to route planning and best practices for staying safe in the backcountry.
Key Takeaways:
- Gear: Focus on the "Big Three" (backpack, shelter, sleep system). Keep pack weight under 40 pounds.
- Permits: Required for most overnight trips. Check park-specific rules and apply early.
- Safety: Carry navigation tools, first-aid supplies, and bear spray. Plan for unpredictable weather.
- Food & Water: Pack 1.5–2.5 lbs of food per day and bring a water treatment system.
- Leave No Trace: Protect the environment by minimizing your impact.
Quick Tips:
- Test your gear before the trip.
- Research trail conditions and water availability.
- Choose trails suited to your fitness level, like Yosemite’s wilderness or the Wonderland Trail.
Whether you’re tackling the Grand Canyon’s Rim-to-Rim or exploring Canyonlands’ Chesler Park Loop, preparation is everything. Read on for detailed advice on gear, permits, and top trails.
Backpacking 30 miles on Outer Mountain Loop | Big Bend National Park 4-Day Adventure
Gear You Need for Multi-Day Backpacking
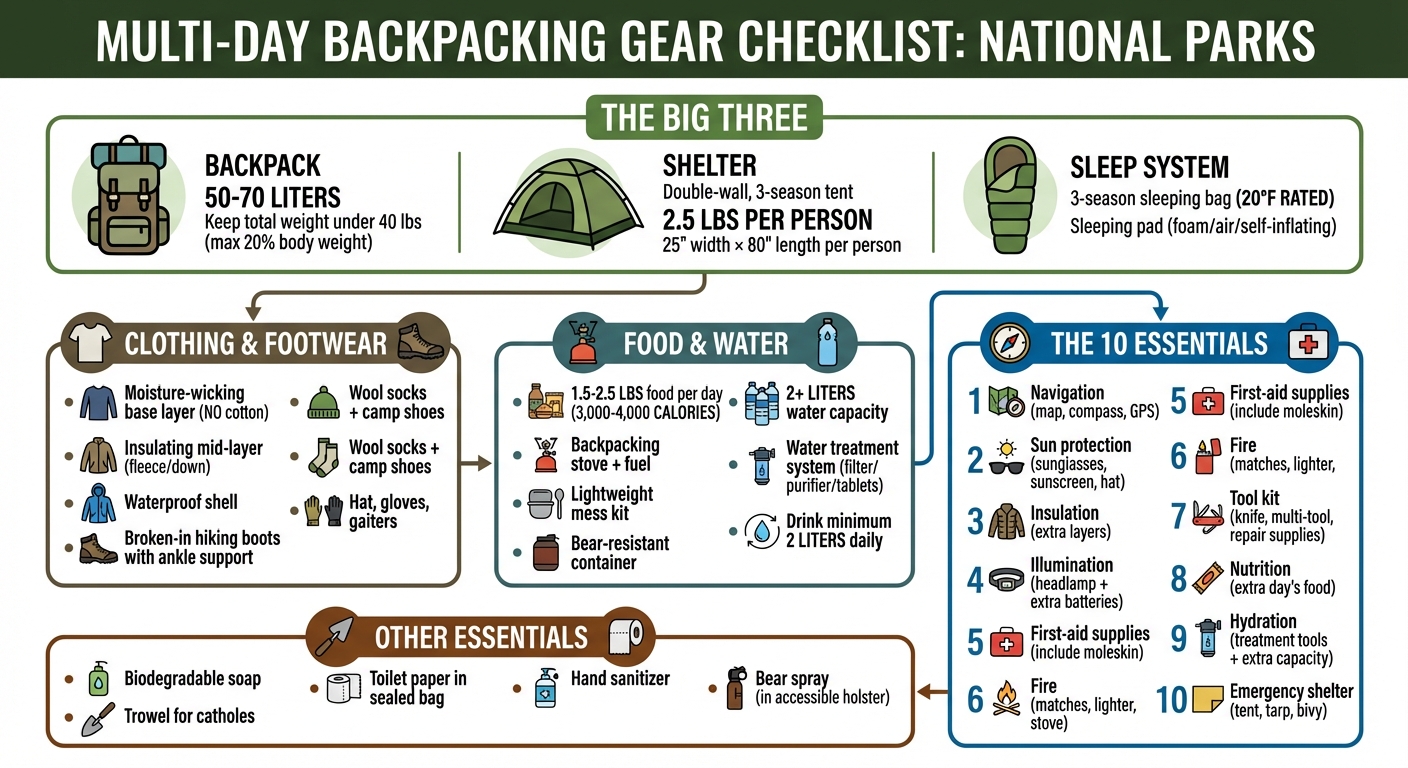
Essential Backpacking Gear Checklist for National Parks
The gear you choose for a multi-day backpacking trip can make or break your experience. The key is to pack only what you need while keeping your kit lightweight and efficient. Ideally, your total pack weight should stay under 40 pounds, and it’s best if it doesn’t exceed 20% of your body weight.
The Big Three: Backpack, Shelter, and Sleep System
Your backpack, shelter, and sleep system will account for most of your pack’s weight and cost, so it’s worth spending time to choose wisely.
When it comes to backpacks, size matters. For multi-day trips, a 50–70 liter pack is typically sufficient to carry your food, water, and core gear. Make sure the pack fits your torso length, and have it adjusted so the hip belt supports most of the weight . Before heading out, load your pack with about 30 pounds and take it on a test hike to ensure it’s comfortable and doesn’t cause any pressure points.
Your shelter is your defense against the elements. A double-wall, three-season, freestanding tent is a versatile option for most conditions. These tents have a separate tent body and rainfly, which help with ventilation and reduce condensation. Look for one that offers about 25 inches of width per person and 80 inches of length. To keep the weight manageable, aim for around 2.5 pounds per person, and split the load – one person can carry the poles and stakes, while another carries the tent body and rainfly . Always use a footprint to protect the tent floor from damage and moisture. If you’re considering a hammock, check the rules first – many national parks don’t allow hammocks tied to trees .
For your sleep system, you’ll need a sleeping bag and pad suited to the lowest temperatures you’ll encounter. A three-season sleeping bag rated to 20°F is a solid choice for most national park trips . Down bags are lighter and pack smaller but lose insulation when wet, whereas synthetic bags are more affordable and retain warmth even when damp. Sleeping pads come in three main types: closed-cell foam (durable and inexpensive), air pads (comfortable and compact but prone to punctures), and self-inflating pads (a mix of both) . For extra warmth, avoid breathing into your sleeping bag, as moisture from your breath can reduce its insulating ability.
Once you’ve got your Big Three sorted, turn your attention to clothing and footwear.
Clothing and Footwear
Proper clothing and footwear are essential for comfort and safety in changing weather. Avoid cotton – it traps moisture and can leave you cold. Instead, go for synthetic or wool materials and layer wisely: a moisture-wicking base layer, an insulating mid-layer (like fleece or down), and a waterproof shell. This system allows you to adapt to varying conditions without carrying bulky outerwear.
For footwear, sturdy, broken-in hiking boots with ankle support are a must. Break them in on shorter hikes to prevent blisters during your trip. Add moisture-wicking wool socks and lightweight camp shoes for relaxing at the end of the day. Depending on the weather, consider packing gloves, a hat, and gaiters for extra protection.
Food, Water, and Cooking Supplies
Plan for 1.5–2.5 pounds of food per person per day, aiming for around 3,000–4,000 calories . Lightweight, calorie-dense options like dehydrated meals, nuts, jerky, and tortillas are great choices. Dried fruits are also lighter than fresh ones. To save space, repackage food into plastic bags instead of carrying heavy containers.
For cooking, bring a backpacking stove, fuel, and a lightweight mess kit that includes essentials like a pot, cup, and spork. If you’re in bear country, a bear-resistant food container is often required by national parks and must fit inside your pack . Set up your cooking and food storage area at least 50 feet away from your sleeping spot.
Carrying all the water you need isn’t practical, so pack at least 2 liters and bring a reliable water treatment system – whether it’s a filter, purifier, or tablets. Plan to drink at least 2 liters daily, and more in hot conditions. In desert areas like Guadalupe Mountains National Park, you’ll need to carry a gallon of water per person per day.
Other Essentials
Don’t forget to pack navigation tools like a physical topographic map and compass or a GPS device. A first-aid kit is crucial – include moleskin for blister care. Other must-haves include a headlamp with extra batteries, a multi-tool or knife, biodegradable soap, a trowel for digging catholes, toilet paper in a sealed bag, and hand sanitizer. Before you go, test all your gear – pitch your tent, light your stove, and try your water filter – to avoid surprises in the backcountry.
Getting Permits and Planning Your Trip
How Permits Work
If you’re planning an overnight stay in the backcountry of most national parks, you’ll need a permit. These permits are essential for managing visitor numbers, preserving fragile environments, and ensuring a safer, less crowded experience. To find out if your destination requires one, check the National Park Service website under sections like "Wilderness Permits" or "Backcountry Camping."
Many parks now use Recreation.gov for permit reservations, so it’s smart to create an account ahead of time. Some parks, like Yosemite, even use a lottery system for high-demand areas. For instance, 60% of Yosemite’s wilderness permits are made available 24 weeks in advance, while the remaining 40% are released just 7 days before your trip. In Grand Canyon National Park, expect a $10 application fee, with additional nightly costs of $15 per person for below-rim camping and $4 per person for above-rim areas.
"A wilderness permit is required year-round for backpacking, overnight climbing, or any other overnight stay in the Yosemite Wilderness." – Yosemite National Park
It’s a good idea to prepare backup plans, including alternate dates and campsites, as some parks offer walk-up permits a day before departure at visitor centers. Once you secure your permit, print it out and keep it handy – rangers may ask to see it and, in some cases, require it to be attached to your pack or tent. With the permit sorted, you can shift your focus to planning a route that suits your group’s abilities.
Planning Your Route and Navigation
When mapping out your route, consider the fitness level of the least experienced person in your group. A good rule of thumb is to plan for 2 miles per hour on flat terrain, adding an extra hour for every 1,000 feet of elevation gain. For steep trails, like those in the Guadalupe Mountains, you’ll need to adjust your pace accordingly. On the first day, especially if you’re starting late (after 10:00 AM), aim for 1–4 miles. On subsequent days, 6–8 miles is a reasonable goal for adults with average fitness levels.
Use topographic maps to pinpoint critical features such as water sources, trail junctions, and designated campsites. While GPS devices and apps are helpful, always carry a paper map and a compass as a backup. Before heading out, check with the park’s ranger station for up-to-date trail conditions. These steps will help ensure your backcountry adventure is both safe and enjoyable.
Packing and Pre-Trip Preparation
With your permits and route finalized, it’s time to focus on packing and logistics. Start by prepacking your bear canister with food and scented items to make sure everything fits. Repackage meals into resealable bags to save space and reduce bulk. When setting up camp, keep your cooking area at least 50 feet away from where you sleep to minimize wildlife encounters.
Leave a detailed trip plan with a trusted contact, including your planned route, campsites, and expected return time. It’s also a good idea to leave a copy of this plan on your car’s dashboard at the trailhead for rangers. Avoid leaving valuables, food, or anything scented in your vehicle, as these can attract wildlife or tempt thieves. Finally, test your gear and review park-specific rules about campfires, waste disposal, and group size limits. A thorough gear check and clear communication complete your backcountry preparations.
sbb-itb-00512f3
Best Multi-Day Backpacking Trails in National Parks
Chesler Park Loop, Canyonlands National Park
The Chesler Park Loop in Canyonlands National Park offers an incredible glimpse into the rugged beauty of the Needles District. This 10.5- to 11-mile loop takes you past striking red-and-white sandstone spires that tower up to 100 feet high. One of the trail’s standout features is the Joint Trail – a short, narrow section of slot canyons with walls rising 20 to 40 feet. Some passages narrow to less than 3 feet, making it a unique and memorable experience. For the best photos, hike this section between 11:00 AM and 1:00 PM, when the light perfectly illuminates the canyon walls. After the Joint Trail, you’ll climb The Escalator, a steep sandstone staircase that opens into a grassy meadow surrounded by towering rock formations.
"This hike easily goes on one of my top desert hikes of all time!"
– Gretchen Stuppy Carlson, Travel Expert
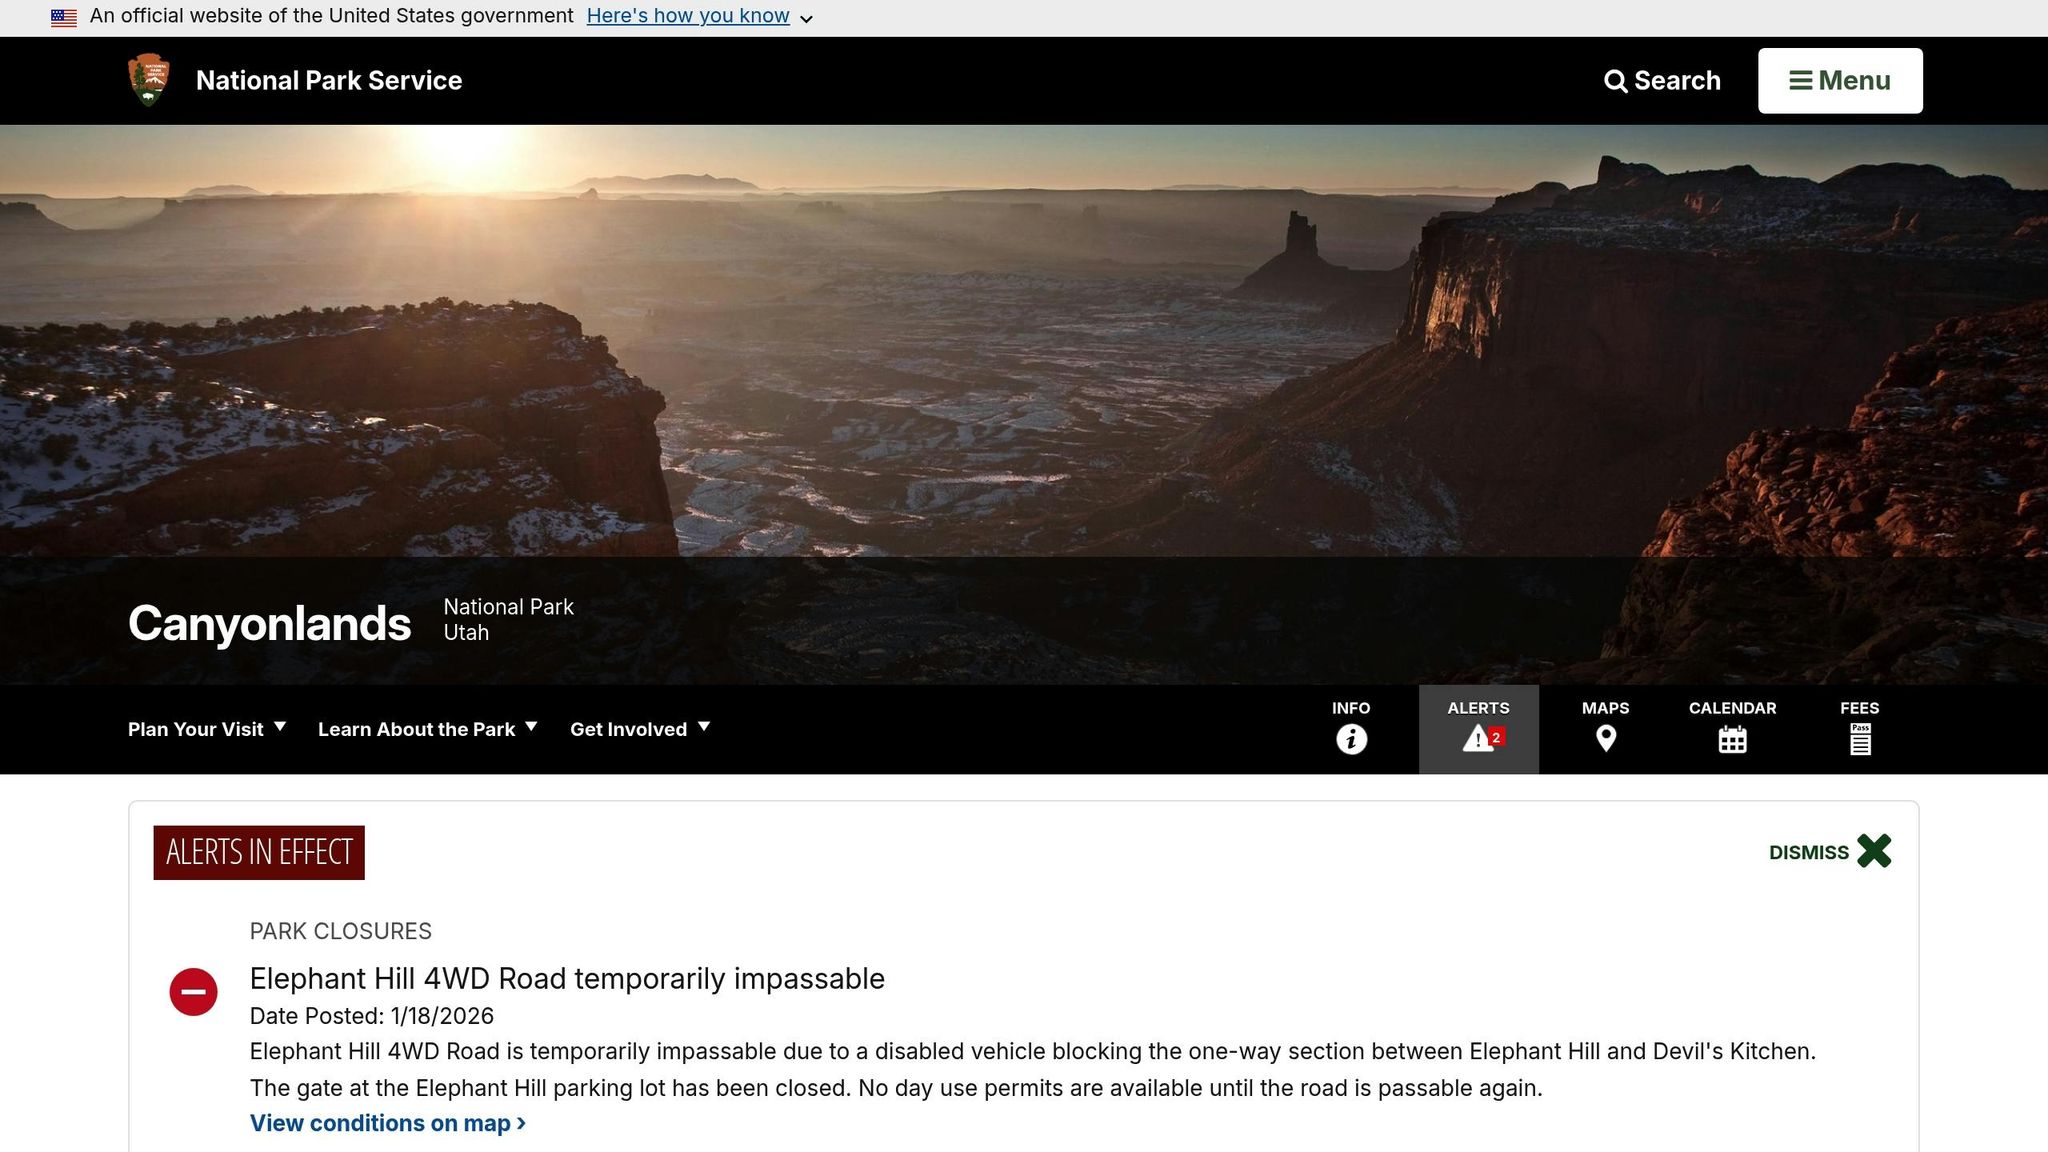
With a total elevation gain of 2,150 feet and no reliable water sources along the route, it’s essential to carry at least 4 liters of water to stay hydrated in the desert environment. This moderate-to-strenuous hike is best done in the cooler months of spring (March/April) or fall (October/November). Be sure to secure a backcountry permit up to four months in advance and pack out all waste using commercial disposal bags. For an overnight stay, campsite CP1 is a favorite for its shade and privacy. While the Elephant Hill trailhead is accessible with a 2WD vehicle, note that the nearby 4WD road remains blocked by a disabled vehicle as of January 18, 2026. Always check current trail conditions at the visitor center before heading out.
Next up, prepare yourself for one of the most challenging routes in the country – the Rim-to-Rim Traverse.
Rim-to-Rim Traverse, Grand Canyon National Park

The Rim-to-Rim Traverse in Grand Canyon National Park is a bucket-list hike for many, but it’s not for the faint of heart. This multi-day trek demands careful planning, especially for the steep uphill sections. A good rule of thumb is to allocate two-thirds of your time for ascending and one-third for descending. Popular routes like the North Kaibab, South Kaibab, and Bright Angel trails are equipped with ranger stations and emergency phones, but water availability can be unpredictable. Currently, water is unavailable at Phantom Ranch and Bright Angel Campground due to a pipeline break, with repairs expected to finish by January 24, 2026.
Summers in the inner canyon can be brutal, with temperatures reaching 106°F in July and 103°F in August. Hikers can lose more than two quarts of fluids per hour in direct sunlight, so carrying at least one gallon of water per day is crucial. You’ll also need to double your food intake, focusing on salty snacks to replenish electrolytes. To maintain a steady pace, use the talk test and take a 10-minute break every hour to recover. In winter, snow and ice can make the upper trails treacherous, so pack trekking poles and crampons for added safety. When encountering mule trains, always step aside on the uphill side of the trail and wait at least 50 feet for the last mule to pass.
"Depending on how prepared you are, your trip can be a vacation or a challenge, a revelation or an ordeal."
– National Park Service
Backcountry permits for camping below the rim cost $10 per application, plus $15 per person, per night. Make sure to secure your permits well in advance before taking on this iconic hike.
After exploring the desert and canyon landscapes, the Wonderland Trail offers a completely different kind of adventure around Mount Rainier.
Wonderland Trail, Mount Rainier National Park
The Wonderland Trail is a 93-mile loop that circles Mount Rainier, taking you through lush rainforests, alpine meadows, and dramatic glacial valleys. This challenging hike includes about 27,000 feet of elevation change, with daily climbs ranging from 2,500 to 5,000 feet. Most hikers complete the trail in 9 to 13 days, staying at one of 18 designated wilderness campgrounds, which feature pit toilets, nearby water sources, and bear-resistant food storage.
The trail’s elevation varies from 2,450 feet at Ipsut Creek to 6,800 feet at Panhandle Gap. Timing is key for this trek – late July to mid-September is the best window. Earlier in the season, snow at higher elevations may require advanced navigation skills and the use of an ice axe. To secure a spot, apply for the wilderness permit lottery between mid-February and April 1, as demand is high.
To lighten your load, consider mailing or caching food supplies at Longmire, Sunrise (White River), and Mowich Lake, which divide the trail into manageable sections. Trail conditions vary depending on the time of year. In late July and early August, you may encounter muddy or snowy patches at higher elevations, along with peak mosquito activity as wildflowers bloom. By mid-August through early September, trails are typically well-maintained and bridges repaired, though mosquitoes may still be present. By mid-September, trails are usually dry, with minimal snow and almost no insects, though wildflowers will have faded. Be cautious during spring snowmelt, as river crossings can be hazardous due to washouts .
Safety Tips and Backcountry Best Practices
Wildlife Safety and Encounters
Once you’ve mapped out your route and packed your gear, it’s time to focus on staying safe, especially when it comes to wildlife. To reduce the chances of an unwanted encounter, store all scented items – food, trash, toiletries, even lip balm – in IGBC-approved bear-resistant containers or hang them at least 10 feet off the ground and 4 feet away from tree trunks. Keep your cooking and food storage areas at least 100 yards downwind from where you sleep to avoid drawing animals to your camp.
Always maintain safe distances: stay at least 100 yards away from bears and wolves, and 25 yards from other wildlife. While hiking, stick with a group of three or more and make noise – talk, sing, or call out – especially in areas with dense brush, near running water, or when approaching blind corners. Carry bear spray in an easily accessible holster, not buried in your pack, and be ready to use it if a bear comes within 60 feet.
"Bear spray is proven to be highly successful at stopping aggressive behavior in bears."
– Kerry Gunther, Bear Management Biologist, National Park Service
If you do encounter a bear, resist the urge to run. Instead, back away slowly as a group. If the bear charges defensively and makes contact, drop to the ground, play dead, and protect your neck. However, if the bear shows predatory behavior or continues its attack, fight back with anything you have. Be alert for signs of bears, like tracks, scat, or carcasses, and leave the area immediately if you spot a fresh carcass.
With wildlife precautions in place, it’s also essential to prepare for the unpredictable nature of backcountry weather and emergencies.
Weather Awareness and Emergency Preparedness
Cell phones are unreliable in the backcountry due to spotty reception, so bring a Personal Locator Beacon (PLB) or satellite messenger for emergencies. Before heading out, leave a detailed trip plan with someone you trust, including your route, expected return time, and vehicle details. This ensures rescuers know where to start looking if something goes wrong.
Check the weather forecast at the visitor center and ask rangers about current conditions like lightning risks, extreme temperatures, or flash flood warnings. Hypothermia can sneak up even in mild weather – most cases occur between 30°F and 50°F. Put on rain gear before getting wet and add warm layers before you feel cold. If someone shows signs like slurred speech or clumsiness, get them into dry clothes and seek shelter immediately.
"When Thunder Roars, Go Indoors"
– National Park Service
During lightning storms, avoid exposed areas like ridges or meadows and seek cover in dense forests instead. Be cautious of flash floods after even moderate rain, and always have an escape route to higher ground planned. If severe weather disrupts your plans, turn back rather than risk pushing forward. To stay sharp and avoid fatigue, take a 10-minute break every hour.
Here’s a quick checklist of essential items to bring for safety and comfort:
| Essential Item | Purpose |
|---|---|
| Navigation | Map, compass, or GPS (plus paper backup) |
| Sun Protection | Sunglasses, sunscreen, and hat |
| Insulation | Extra layers for sudden temperature drops |
| Illumination | Headlamp or flashlight with extra batteries |
| First-Aid Supplies | Treatment for blisters, cuts, and injuries |
| Fire | Matches, lighter, or stove for cooking/warmth |
| Tool Kit | Knife and gear repair supplies |
| Nutrition | Extra day’s supply of high-energy food |
| Hydration | Water treatment tools and extra capacity |
| Emergency Shelter | Lightweight tent, tarp, or bivy sack |
Source: NPS Ten Essentials [2][27]
Leave No Trace Principles
In addition to staying safe, make it a priority to reduce your impact on the environment. Pack out all trash, including biodegradable items, as they can attract wildlife. When cleaning dishes, strain the dishwater and scatter it at least 100 yards from your campsite. Always purify backcountry water by boiling, filtering, or using chemical treatments to avoid illnesses like giardiasis.
Choose established campsites whenever possible. If you must camp in a pristine area, pick durable surfaces like rock, gravel, or dry grass, and keep your site at least 200 feet from water sources. Avoid trampling vegetation and bury human waste in a cathole 6 to 8 inches deep, also 200 feet away from water, trails, and campsites.
"The difference between a great hike or a trip to the hospital is up to you!"
– Grand Canyon National Park
Respect wildlife by keeping your distance and never feeding animals. Keep noise to a minimum, especially during dawn, dusk, and nighttime when animals are most active. Stick to marked trails to prevent erosion and safeguard delicate ecosystems. Remember, venturing off-trail increases the likelihood of human–bear conflicts.
Preparing for Your Backpacking Adventure
Key Takeaways
Let’s cover the essentials: Your Big Three – the backpack, shelter, and sleep system – are the backbone of your gear. Add the 10 Essentials to stay prepared for emergencies, unpredictable weather, or unexpected delays. These basics are non-negotiable for a safe and successful trip.
If you’re planning an overnight backcountry trip, you’ll likely need a permit. The rules vary depending on the park. For instance, Denali National Park offers free permits but requires you to pick them up in person no more than a day before your trip. On the other hand, Guadalupe Mountains National Park charges $6.00 for a reservation and an additional $6.00 per person per night. To avoid last-minute stress, secure your permit early through Recreation.gov or at the park’s ranger station. Double-check the pickup requirements to stay on schedule.
When mapping out your route, be realistic about your pace and fitness. In rugged areas like Grand Teton, plan for a maximum of 2 miles per hour, and add an hour for every 1,000 feet of elevation gain. Always carry navigational backups – like a map and compass – because GPS devices and phone apps can fail due to dead batteries or poor signal. Before you set out, check the latest weather updates and park alerts for trail closures, water source issues, or fire restrictions .
"Knowledge and preparation can increase your comfort level and reduce your chances of injury. Remember, you are ultimately responsible for your own safety."
– National Park Service
This advice pulls together the essentials for gear, permits, and safety. With these points in mind, you’re ready to take the next steps toward your adventure.
Next Steps for Your Adventure
Choose a trail that matches your experience and fitness level. Research the park’s specific rules – like whether bear-resistant canisters are required or if campfires are banned . Before you go, test your gear at home. Set up your tent, fire up your stove, and run your water filter to make sure everything works. If you’ve got new boots, break them in with a few hikes to avoid blisters on the trail .
Let someone you trust know your itinerary and expected return time. Don’t forget to secure your vehicle before heading out.
Need more tips, trail suggestions, or the latest park updates? Visit The National Park Guide. Now, it’s time to pack your gear and hit the trail. Adventure awaits!
FAQs
What are the key safety tips for avoiding and handling wildlife encounters while backpacking?
Staying safe around wildlife begins with minimizing encounters whenever you can. Pay attention to your surroundings by looking for signs like tracks, scat, or feeding areas. Make noise while hiking – talk, clap, or use a bear horn – especially in thick brush or near water, where visibility is limited. Stick to marked trails and hike during daylight hours, as animals like bears are less active then. To avoid attracting wildlife, store food, toiletries, and anything scented in bear-proof containers or hang them at least 10 feet off the ground and 4 feet away from tree trunks. Keep bear spray within easy reach and practice using it before heading out.
If you do come across an animal, stay calm and maintain distance. Never run – it can provoke a chase. Instead, back away slowly while facing the animal and speaking in a calm, steady voice. If a bear approaches, stand your ground, make yourself look larger, and use bear spray if it gets within 30 feet. For animals like moose, elk, or mountain lions, keep children and pets close, avoid sudden movements, and slowly retreat without turning your back. Planning ahead – filing your itinerary and reviewing wildlife safety guidelines specific to your destination – can help you enjoy a safer outdoor experience.
How do I make sure I have enough water and food for a multi-day backpacking trip?
To get ready for your trip, start by figuring out how much water you’ll need each day. A good rule of thumb is 2 liters (about ½ gallon) of water per person per day, but you’ll need more in hot weather or at high altitudes. Multiply this by the number of days you’ll be out, and then add a 30% buffer for emergencies. It’s smart to pack a reliable water filter or purification tool so you can safely refill from streams or lakes. If water sources are scarce along your route, think about pre-stashing water at campsites or filling larger containers before you hit the trail.
When it comes to food, aim for 2,500–4,500 calories per day, depending on how strenuous your hike will be. Look for lightweight, calorie-dense foods like dehydrated meals, nuts, energy bars, and freeze-dried fruit. Pack an extra 10–20% of food just in case, and plan a day-by-day menu to help you stay on track. If your route includes resupply points, use them to lighten your load by restocking along the way. And don’t forget to store your food in bear-proof containers or park-approved canisters to keep wildlife (and your supplies) safe.
For more details about water availability, campsites, and permits specific to your destination, check out resources like The National Park Guide to fine-tune your plan before setting off.
What should I do if the weather changes unexpectedly while backpacking?
If the weather suddenly shifts, your safety should be your top priority. Take a moment to assess your surroundings for signs of deteriorating conditions – look out for dark clouds, increasing winds, or a noticeable drop in temperature. If things seem to be getting worse, move to a safer area. Steer clear of exposed spots like ridges, open meadows, or summits, and head for lower ground or a natural windbreak instead.
Whenever possible, stay informed with weather updates. Use a reliable weather app or get in touch with the park’s ranger station for the latest alerts. If you have cell service, let someone know your location and current situation – whether it’s a trusted contact or a park ranger. In severe weather conditions, such as lightning, heavy rain, or freezing temperatures, it’s best to turn back or seek a secure spot. Keep yourself warm and dry by layering clothing and protecting your gear from getting wet. Remember, your safety is far more important than reaching your planned destination.