
Wildlife sightings are more about timing, distance, and patience than luck. I’d keep three rules in mind: go early, scan for signs before I move in, and stay far enough away that the animal does not change its behavior.
Here’s the short version:
- I check park rules before I hike because distance limits vary.
- I aim for dawn or dusk, with 5:00 AM to 8:00 AM often giving me the best odds.
- I look near water, meadow edges, and forest borders, where animals often pass through.
- I use binoculars or a telephoto lens instead of walking closer.
- I watch for tracks, scat, claw marks, chewed plants, and movement at habitat edges.
- I back away if an animal stares, stops feeding, shifts posture, or moves toward me.
A few numbers matter. The National Park Service says to stay at least 25 yards from most wildlife and 100 yards from bears and wolves. Some parks require more space, such as 150 feet or even 150 feet from all wildlife, depending on the park.
The bottom line: if I prepare before the hike, move slowly, and give animals room, I have a much better shot at seeing wildlife while keeping both me and the animal safe.
Prepare before you hike
A good wildlife hike starts before you hit the trail. Check the season, local rules, and trail conditions first. That helps you pick the best season, trail, and start time for what you want to see.
Check seasonal wildlife activity, trail rules, and weather
Try to match your hike to what’s happening in the park that time of year. Spring can mean newborn animals. Fall often brings rutting elk. Winter can make high-country wildlife easier to spot.
Before you go, read the park’s Superintendent’s Compendium, which is the official local rulebook. Distance rules can change from park to park. For example, Rocky Mountain National Park requires visitors to stay 75 feet from most wildlife and 120 feet from bears, moose, and mountain lions. Olympic National Park requires 150 feet from all wildlife.
It also helps to check for trail closures and current alerts tied to fire impacts, bear activity, or nesting seasons. And watch the weather. Low light, fog, and rain can make it much harder to judge distance in the field.
Pick the right time of day and a less crowded trail
Wildlife tends to move most at dawn and dusk. If you want better odds, plan to be on the trail between 5:00 AM and 8:00 AM.
Trail choice matters too. Quieter routes near water, meadow edges, or other habitat boundaries often give you a better chance of seeing animals without a crowd around you.
Pack gear that lets you keep your distance
The right gear makes a big difference. It lets you stay back and still get a clear look.
Bring:
- binoculars
- a telephoto lens
- a spotting scope for open-country viewing
- a field guide or the iNaturalist app
- a red-light headlamp for dawn hikes
- earth-tone clothing
Red light helps preserve your night vision and causes less disturbance to animals that are active in low light. Earth tones help you blend in more, and it’s smart to avoid strong scents too.
Once you’re on the trail, use that gear to scan for signs before you move closer.
sbb-itb-00512f3
Read the trail for signs of wildlife
Wildlife often leaves hints before you ever see the animal itself. That’s where the gear from the last section comes in handy. Use it to spot clues early, before you get any closer.
Look for tracks, scat, feeding marks, and fresh activity
The ground, trees, and brush around you can tell you a lot about what passed through recently. Sharp-edged tracks in mud, damp soil, or snow usually point to recent activity. Rounded edges often mean the print is older or part of a well-used animal trail.
Scat is another useful sign. It can show what an animal has been eating, and how fresh it looks can help you judge when it was left behind.
Some of the most common signs to watch for include:
- Sharp tracks
- Scat
- Stripped bark
- Claw marks
- Chewed twigs
- Dug soil
- Shed fur, feathers, or antlers
Watch habitat edges and listen before moving farther
Once you spot fresh sign, pay close attention to the places animals tend to use the most. Wildlife is often more active where two habitats meet, like forest edges next to meadows or spots near streams and ponds. These transition zones are a good place to slow down.
Scan habitat edges first. Then move your eyes across the clearing slowly. Don’t wait to see a full animal. Look for small signals instead, like shapes, silhouettes, or ears rising above grass or rocks.
Pause often and listen. Alarm calls, snapping branches, and rustling brush can all hint that an animal is nearby before you see it.
Walk quietly so fresh tracks, movement in the brush, and distant calls are easier to notice.
If you find fresh sign, slow down and watch from a distance.
Observe wildlife without disturbing it
Once you’ve spotted an animal, the job changes. Now it’s about watching without changing its behavior.
Wild animals act most naturally when they don’t know you’re there. So stay on the trail, keep your voice low, and skip sudden movements. Don’t feed, touch, or try to draw wildlife closer. That also means no bird calls, whistles, clicking, or imitation-sound apps. In national parks, using those sounds to trigger a response counts as harassment and is illegal.
When you notice fresh sign or finally see the animal itself, stop. Let the animal set the distance.
Use distance, patience, and quiet movement
Instead of stepping closer, watch from where you are. If you can, pause behind natural cover and keep observing from that spot.
The best clue that you’re too close is the animal’s behavior. If it stops feeding, keeps staring at you, shifts its posture, or starts to move away, back off at once. Here’s a simple check: stretch out your arm and cover the animal with your thumb. If your thumb doesn’t fully cover it, you’re too close and should move back.
Follow posted park distance rules, and give large animals even more room. Just as important, leave the animal a clear path to retreat so it never feels trapped.
Use zoom to photograph safely instead of closing the gap
If you want a closer view, let your gear do the work. A telephoto lens or spotting scope helps you stay back while still getting detail.
Pay close attention to any reaction. A glance in your direction, a change in posture, or even one step away is your cue to back off.
If the animal starts coming toward you, seems tense, or blocks your path, move away and switch to the safety steps next.
Stay safe if an encounter changes
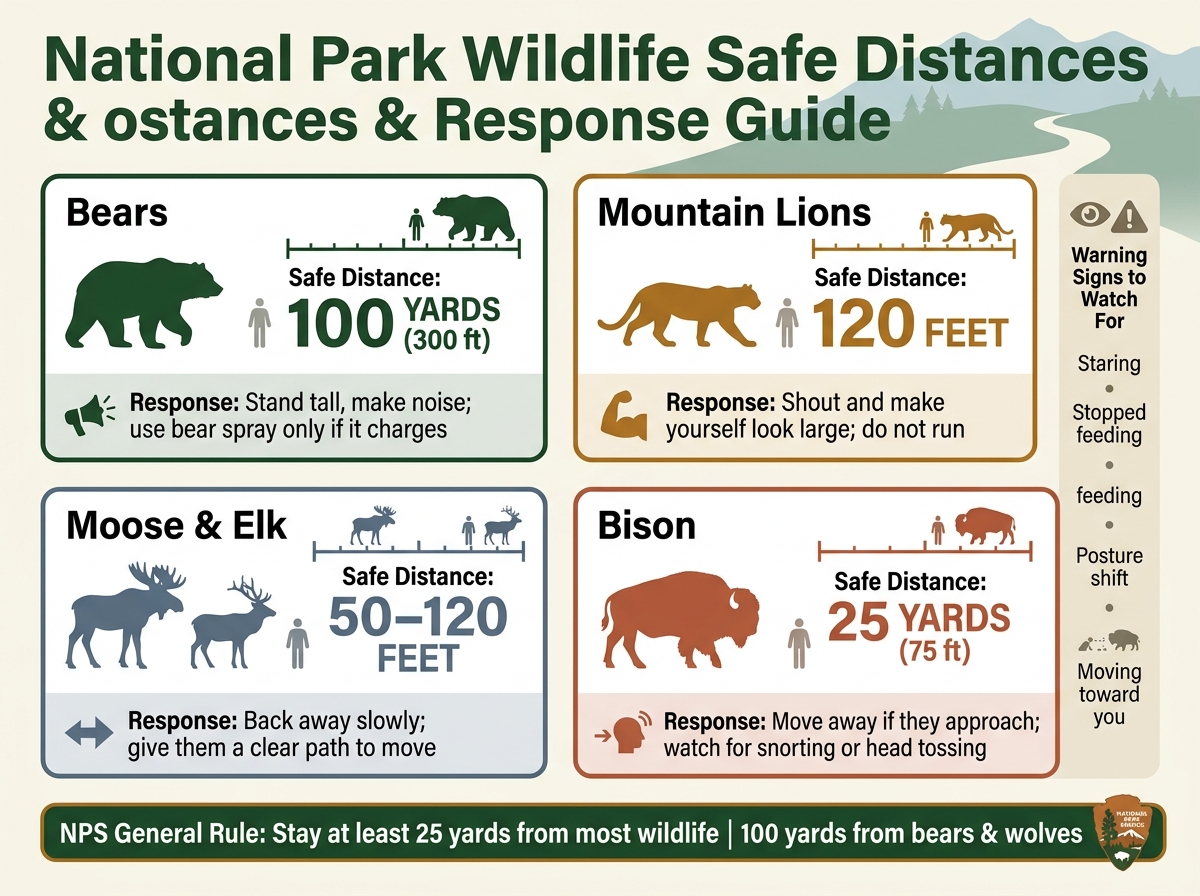
National Park Wildlife Safe Distances & Response Guide
If an animal shifts its behavior, stop watching and focus on safety.
Back away slowly when animals are tense or agitated
If an animal reacts to your presence, you’re already too close. Don’t run. Running can trigger a chase response. Stop, stay calm, and slowly back away while keeping the animal in sight.
If a large animal is blocking the trail, wait for it to move or turn around. Don’t try to squeeze past it. And never get between a parent and its young. If you see cubs or a calf but not the adult, leave the area at once.
Look for warning signs such as bluff charges, stomping, huffing, or raised fur.
Store food properly and follow park wildlife guidance
Food smells pull animals toward people. That includes more than snacks. Toiletries, lotions, empty containers, and trash can all smell like food to wildlife.
In developed areas, store food and scented items in your vehicle’s trunk with the windows fully closed, or use park-provided wildlife-proof lockers. In the backcountry, hang food bags at least 15 feet high and 10 feet from tree trunks or poles.
If the encounter gets worse, match your response to the animal:
| Animal | Safe Distance | Response |
|---|---|---|
| Bears | 100 yards (300 ft) | Stand tall, make noise; use bear spray only if it charges |
| Mountain Lions | 120 feet | Shout and make yourself look large; do not run |
| Moose & Elk | 50–120 feet | Back away slowly; give them a clear path to move |
| Bison | 25 yards (75 ft) | Move away if they approach; watch for snorting or head tossing |
If any animal approaches you, acts strangely, or makes physical contact, report it to a park ranger right away.
Conclusion: Spot more wildlife by preparing, slowing down, and giving animals space
Prepare ahead of time, stay quiet, back away early, and give wildlife room.
Respectful viewing protects you and helps keep animals wild. The less you affect their behavior, the more likely you are to see those natural, memorable moments.
FAQs
What if I see wildlife but can’t identify it?
Watch for key details like size, shape, color, and markings. It also helps to note how the animal acts and how it moves through its surroundings.
Then check a field guide or an ID app like Merlin Bird ID or iNaturalist. You can also use The National Park Guide’s online tool to pick a park and enter animal traits to narrow down the species.
How do I judge distance safely on the trail?
Check the rules for the park you’re visiting, because wildlife distance limits can change from place to place. Many parks require you to stay at least 25 yards from most animals and 100 yards from predators like bears and wolves. Others use 75 feet or 100 feet, depending on the species.
Here’s a simple way to think about it: if an animal reacts to you or changes its behavior, you’re too close. Never put a photo ahead of safety. If an animal moves toward you, slowly back away.
What should I do if I hear an animal but can’t see it?
Stay still and keep quiet so you don’t disturb or startle wildlife. Pay attention to natural sounds, like bird or squirrel alarm calls, rustling leaves, snapping branches, or splashing water.
If you’re patient and don’t move, the animal may come out on its own. You can also use apps like Merlin Bird ID to help identify species by their calls.