
If I wanted the simplest plan for a Rocky Mountain drive, I’d focus on 7 stops: Many Parks Curve, Rainbow Curve, Forest Canyon, Alpine Visitor Center, Milner Pass/Lake Irene, Bear Lake Road pullouts, and Kawuneeche Valley.
In one trip, you can drive 48 miles on Trail Ridge Road, climb to 12,183 feet, add lake stops on Bear Lake Road, and see everything from valley meadows to tundra. I’d plan at least 3 days, expect temperatures at high overlooks to be 20°F to 30°F colder than lower areas, and budget $35 for a 7-day vehicle pass plus a $2 timed-entry reservation fee when required.
Here’s the short version:
- Best east-side valley views: Many Parks Curve
- Best early high-overlook stop: Rainbow Curve
- Best short paved walk to a canyon view: Forest Canyon
- Best high-point stop with services: Alpine Visitor Center
- Best divide photo stop: Milner Pass
- Best lake-and-forest side trip: Bear Lake Road
- Best west-side wildlife area: Kawuneeche Valley
The route is simple: start on Trail Ridge Road for the high mountain drive, then add Bear Lake Road for lakes and short walks. If I were planning the trip, I’d start early for parking and wildlife, keep extra layers in the car, and leave room for a full 6 to 8 hours of stopping even though the drive itself is much shorter.
Quick Comparison
| Stop | Main view | Walk | Best use |
|---|---|---|---|
| Many Parks Curve | Valleys and meadows | Very short | First overlook from Estes Park |
| Rainbow Curve | High mountain panorama | Short optional path | Early westbound stop |
| Forest Canyon | Deep glacial canyon | 0.2-mile paved path | Short scenic stop |
| Alpine Visitor Center | Tundra and summit views | 0.6-mile steep walk or longer paved option | Midday stop with exhibits and food |
| Milner Pass / Lake Irene | Divide marker and lake scenery | Little to short loop | West-side photo and picnic stop |
| Bear Lake Road Pullouts | Lakes, forest, meadows | 0.5- to 0.6-mile easy loops | Half-day lake drive |
| Kawuneeche Valley | Meadows and wildlife | None to easy trails | Moose and elk viewing |
If you want the shortest shortlist, I’d pick Many Parks Curve, Forest Canyon, Alpine Visitor Center, and Kawuneeche Valley.
📍TRAIL RIDGE ROAD: Everything you Need to Know–Scenic Stops + Wildlife Viewing + Know Before You Go
sbb-itb-00512f3
Trail Ridge Road and Bear Lake Road Overview
Trail Ridge Road is where you go for big alpine views. Bear Lake Road is where you go for lakes, trees, and easier access to popular trailheads. Put them together, and you get one of the simplest scenic drives to stretch across a couple of days in the park.
Trail Ridge Road
Trail Ridge Road is the park’s high-alpine corridor. It runs between Estes Park and Grand Lake, crosses 11 miles of tundra above treeline, and serves up the park’s biggest overlook views.
Bear Lake Road
Bear Lake Road is a 9.2-mile corridor that branches off the main park road and climbs from 8,200 to 9,475 feet. As you drive, the scenery changes from open ground to forest and lakes, with access to some of the park’s main trailheads.
The table below makes the choice easier based on route, timing, and the kind of scenery you want.
| Feature | Trail Ridge Road | Bear Lake Road |
|---|---|---|
| Length | 48 miles | 9.2 miles |
| Peak Elevation | 12,183 feet | 9,475 feet |
| Primary Scenery | Alpine tundra, sweeping vistas | Sub-alpine lakes, dense forest |
| Open Season | Late May to mid-October | Year-round, weather permitting |
| Permit | "Park Access" Timed Entry | "Park Access+" Timed Entry |
Season, Weather, and Entry Rules
Trail Ridge Road usually opens in late May or early June and closes by mid-October. Bear Lake Road stays open year-round if weather allows. Entry rules are different too: Trail Ridge Road uses Park Access timed entry, while Bear Lake Road uses Park Access+.
If you want broad alpine overlooks, Trail Ridge Road is the better fit. If you’d rather make shorter stops around lakes and forest, Bear Lake Road makes that easy. With that in mind, the seven stops below are simplest to plan in route order.
Quick Comparison of the 7 Scenic Stops
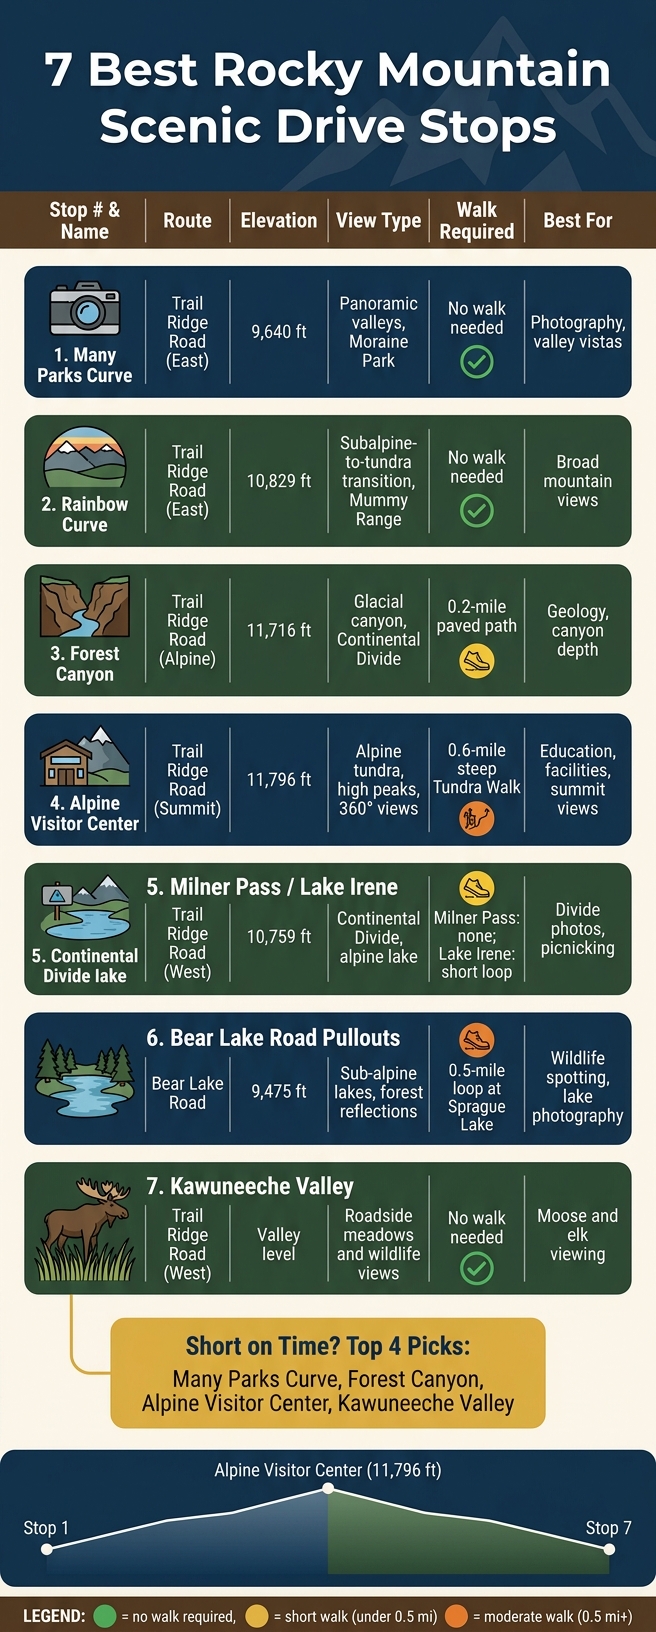
7 Best Rocky Mountain Scenic Drive Stops: Quick Comparison Guide
These seven stops run from easy roadside overlooks to short walks, so you can mix big mountain views, alpine lakes, and wildlife watching into one multi-day drive. If you want the fast version, this table makes it easy to compare them at a glance.
| Stop | Route | Elevation | View Type | Walk Required | Best For |
|---|---|---|---|---|---|
| 1. Many Parks Curve | Trail Ridge Road (East) | 9,640 ft | Panoramic valleys, Moraine Park | No – visible from parking/roadside | Photography, valley vistas |
| 2. Rainbow Curve | Trail Ridge Road (East) | 10,829 ft | Subalpine-to-tundra transition, Mummy Range | No – visible from parking | Broad mountain views |
| 3. Forest Canyon | Trail Ridge Road (Alpine) | 11,716 ft | Glacial canyon, Continental Divide | Yes – 0.2-mile paved path | Geology, canyon depth |
| 4. Alpine Visitor Center | Trail Ridge Road (Summit) | 11,796 ft | Alpine tundra, high peaks, 360° views | Yes – 0.6-mile steep Tundra Walk | Education, facilities, summit views |
| 5. Milner Pass / Lake Irene | Trail Ridge Road (West) | 10,759 ft | Continental Divide, alpine lake | Milner Pass: No; Lake Irene: Short loop | Divide photos, picnicking |
| 6. Bear Lake Road Pullouts | Bear Lake Road | 9,475 ft | Sub-alpine lakes, forest reflections | Yes – 0.5-mile loop at Sprague Lake | Wildlife spotting, lake photography |
| 7. Kawuneeche Valley | Trail Ridge Road (West) | Valley level | Roadside meadows and wildlife views | No | Moose and elk viewing |
One pattern jumps out fast: elevation climbs hard on the east side, tops out at Alpine Visitor Center, then drops into west-side meadows where wildlife sightings become more common.
If you’re short on time, stick with Many Parks Curve, Rainbow Curve, or Kawuneeche Valley. They give you strong views without asking much of your legs. If a short walk sounds worth it, Forest Canyon, Lake Irene, and the Tundra Walk add a bit more variety without turning the stop into a full hike.
Use this side-by-side view to match each stop with your time, energy level, and driving direction.
1. Many Parks Curve Overlook
At 9,691 feet, Many Parks Curve is the first big overlook west of the Beaver Meadows Entrance. From the roadside pullout, you get a broad view over Horseshoe Park, Moraine Park, Beaver Meadows, and parts of Estes Park, with the Mummy Range off in the distance. It’s a smart first stop before the road starts climbing higher.
The pullout is paved and has two parking areas, plus a short path that leads to the viewing platform. There’s also a nearby rock outcrop if you want a higher angle for photos.
Use this as your opening stop on a Trail Ridge Road day. Elk and moose often use the meadows below before the climb into the tundra. From here, Trail Ridge Road heads up toward Rainbow Curve.
2. Rainbow Curve Overlook
Rainbow Curve Overlook sits at 10,829 feet, right where the landscape starts changing from subalpine forest to the park’s high alpine terrain. It’s one of those stops that gives you a lot almost immediately. From the pullout, you can look out over Horseshoe Park, the Alluvial Fan, Hidden Valley, Fall River, and the Beaver Ponds, with Ypsilon Mountain, Hagues Peak, and Mummy Mountain rising in the distance.
This makes it a strong early stop on the east side of the drive, before the road keeps climbing into the tundra. You don’t need to hike to get the main view. A low stone wall runs along the switchback, and there’s also a short interpretive trail that explains the local geology.
You’ll also start to see krummholz here, which marks the move toward alpine tundra. That shift is part of what makes this overlook stand out. You’re not just looking at a nice scene – you’re watching the park change elevation, plant life, and mood in real time.
If you can, get here before 9:00 AM. The parking area holds about 30 vehicles, and it fills fast in summer. There are vault toilets here too, which matters more than you might think, since restroom options are limited between Hidden Valley and the Alpine Visitor Center. For most people coming from Estes Park, this works best as an early westbound stop. From here, the road keeps climbing toward the alpine zone and Forest Canyon.
3. Forest Canyon Overlook
Forest Canyon Overlook sits at 11,716 feet and opens up to a sweeping view of Forest Canyon, a glacial U-shaped valley that drops about 2,500 feet. Down on the valley floor, you can spot Hayden Gorge and the Gorge Lakes. In the distance, Stones Peak, Sprague Mountain, Terra Tomah Mountain, and Taylor Peak trace the Continental Divide.
Getting to the viewpoint is easy. A short, paved, accessible 0.2-mile round-trip path runs from the parking area to the lookout platform, so it’s a solid stop if you want something quick or need an easier walk.
It also feels MUCH colder up here than in Estes Park. Temperatures are often 20 to 30°F lower, and strong wind can hit even in summer. That makes this a handy midpoint stop as you keep climbing toward the summit.
After Rainbow Curve, Forest Canyon gives you the first big deep-canyon view on Trail Ridge Road. Morning is your best bet. The lot fills fast from 9:00 AM to 2:00 PM in summer, and afternoon thunderstorms become more likely later in the day. This stop also marks the move from the east-side overlooks into the highest alpine stretch of the drive. It’s the last major canyon overlook before the Alpine Visitor Center, and from here the road keeps climbing toward it.
4. Alpine Visitor Center and Tundra Walk
After Forest Canyon, Trail Ridge Road reaches its highest point. The Alpine Visitor Center sits at 11,796 feet, which makes it the highest visitor center in the National Park System.
From this ridge, the views open up in a big way. You’re looking down Fall River Canyon toward Longs Peak and Estes Park, with the Mummy Range and the Continental Divide stretched across the horizon.
This stop gives you two short walk options:
- Alpine Ridge Trail: a steep 0.6-mile round trip climb, also known as Huffer’s Hill. It rises to 12,005 feet and includes a lot of steps. At the top, you get a full 360-degree alpine view.
- Tundra Communities Trail: a flatter 1.1-mile paved walk at Rock Cut. It sits at 12,110 feet and passes mushroom-shaped rock formations and the 28-million-year-old Lava Cliffs.
These are best thought of as quick add-ons to the drive, not separate hikes.
If you’re visiting in summer, get here before 9:00 AM. On weekends, parking can take 20 to 30 minutes. Weather is also a big deal up here. Afternoon thunderstorms can build fast above treeline, so plan to be back below 11,000 feet by early afternoon.
Need a snack or coffee? Trail Ridge Store & Cafe is the only food and coffee stop at this elevation.
On a multi-day road trip, this makes a smart midpoint stop on Trail Ridge Road. Plan on 1 to 1.5 hours for parking, exhibits, and one of the short walks. From here, the road starts its descent on the west side.
5. Milner Pass and Lake Irene Views
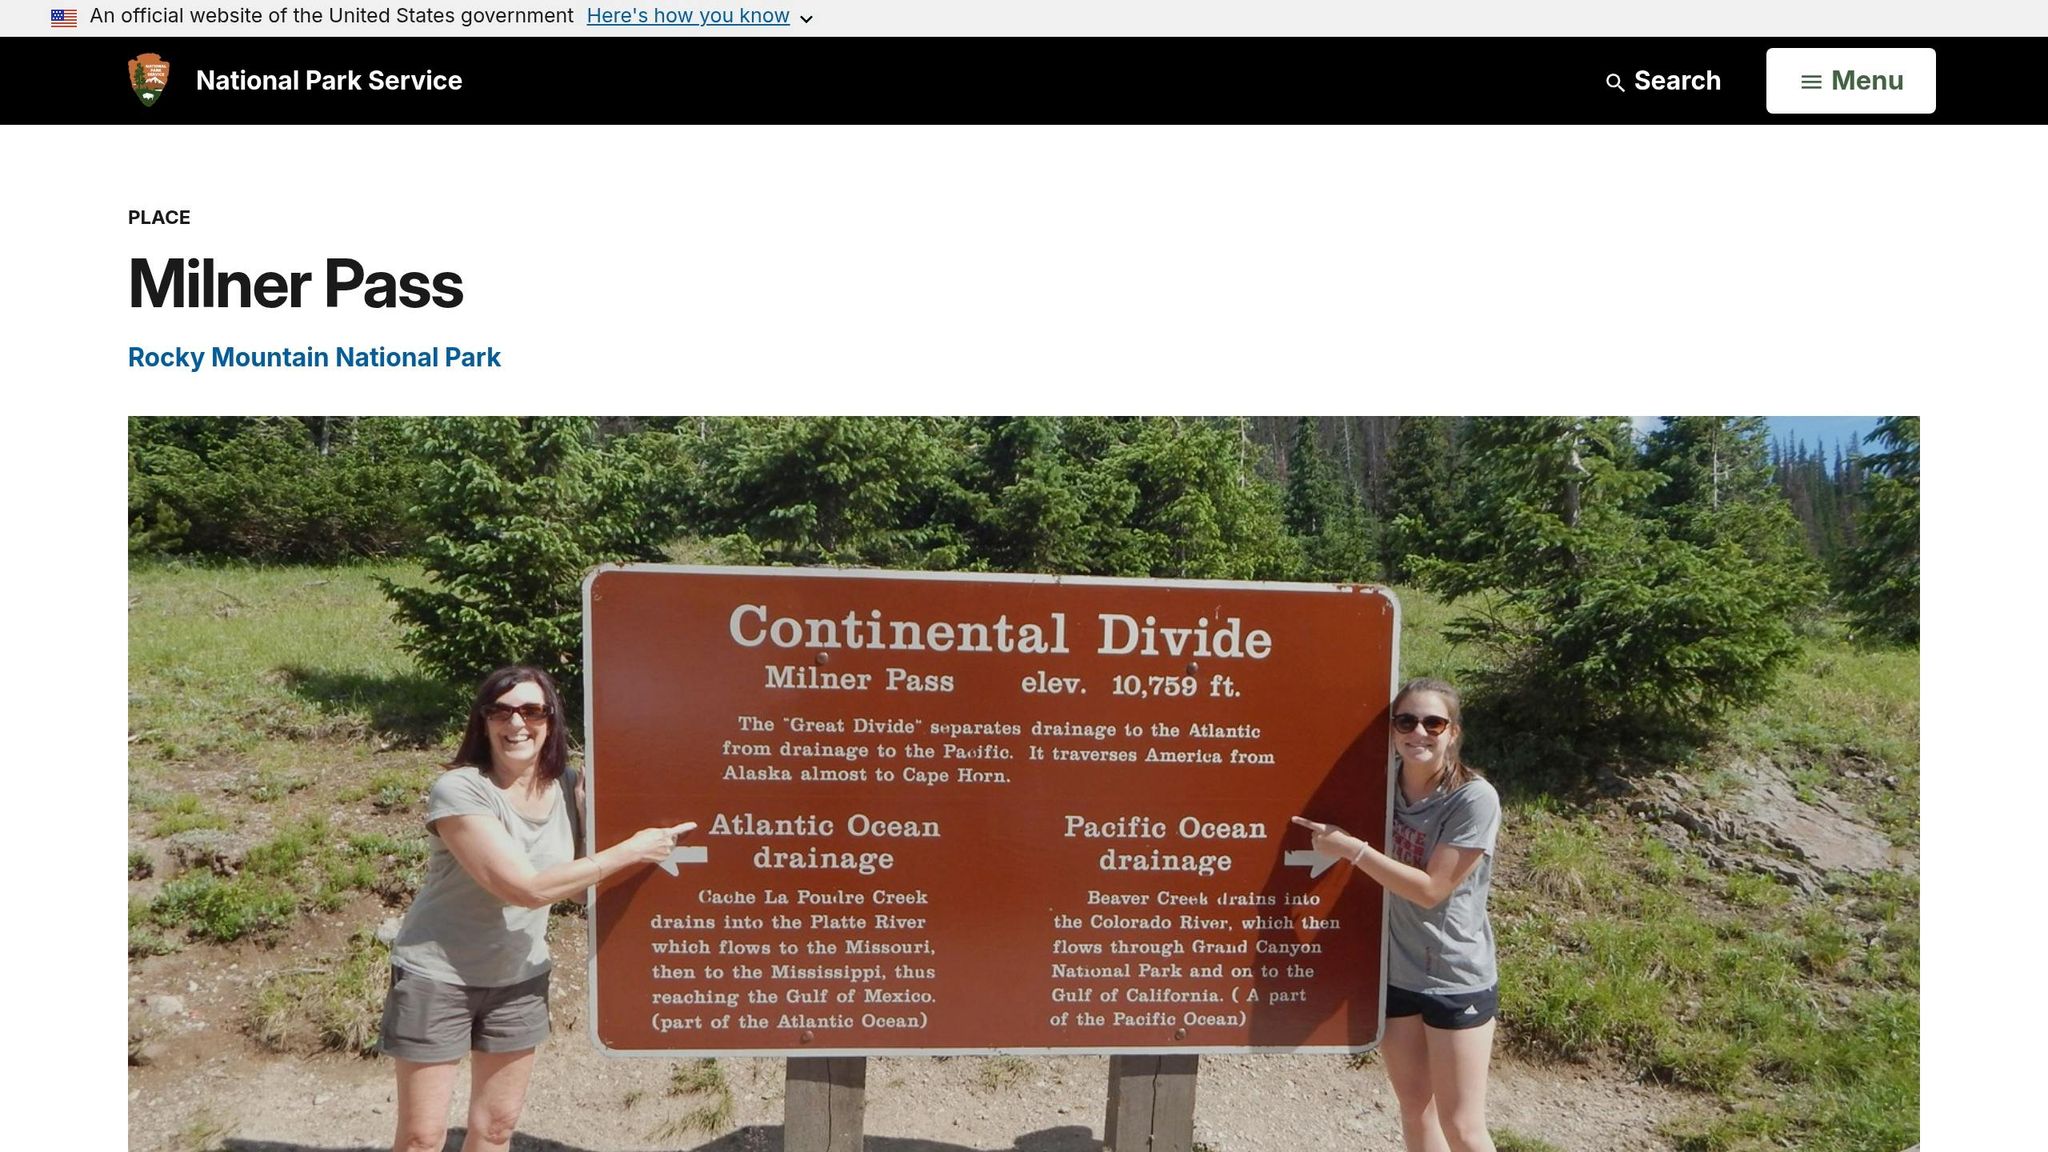
West of the Alpine Visitor Center, Trail Ridge Road starts dropping toward the park’s west side. Milner Pass, at 10,759 feet, makes for an easy stop as you begin that descent.
Right by the parking area, you’ll find the Continental Divide marker, which makes this a simple place to pull over and snap a photo. Poudre Lake sits just below the pass and is reached by a short trail.
A little farther west, the road still feels high in the mountains, but the stops become calmer and easier. Lake Irene has a 0.5-mile loop plus a picnic area. Across the road, Sheep Rock is a good place to look for bighorn sheep.
Early morning or late afternoon usually brings better light and better wildlife viewing. It’s a nice shift in pace as the drive moves from the open tundra down toward Kawuneeche Valley.
6. Bear Lake Road Pullouts
After the high tundra along Trail Ridge Road, Bear Lake Road feels different right away. The scenery shifts to lakes, open meadows, and easy pullout stops that work well for wildlife watching and lake photos.
Moraine Park is a standout for broad meadow views, river scenes, and some of the park’s best elk and moose watching during the fall rut. From there, the road leads toward the park’s most visited lake pullouts.
Sprague Lake is one of the easiest spots to get close to a subalpine lake. It has a short, flat, wheelchair-accessible loop that stretches 0.5 miles. Bear Lake has a similar accessible loop of 0.6 miles. Both walks take about 20 minutes, so they’re easy to fit into a half-day drive.
Timing makes a big difference here. In peak season, the Bear Lake parking lot often fills by 8:00 AM. Show up later, and it’s smart to use the free Park & Ride shuttle, which stops at the main trailheads and pullouts along this corridor.
At sunrise, Sprague Lake often reflects alpenglow on Hallett Peak and Flattop Mountain across the water. It’s one of those scenes that feels almost too perfect to be real. Early morning and late afternoon are also the best times to look for wildlife in Moraine Park.
This stretch is the park’s easiest half-day option for lake and meadow scenery.
From Bear Lake Road, the drive continues west to Kawuneeche Valley.
7. Kawuneeche Valley Wildlife Area
Kawuneeche Valley lies on the west side of Rocky Mountain National Park, near the Grand Lake entrance. It’s a green glacial valley filled with willow thickets, wet meadows, and the headwaters of the Colorado River, with the Never Summer Mountains rising in the background.
If your main goal is wildlife, this area deserves a spot on your route. It’s one of the best places in the park to see moose. They’re often spotted in the willow thickets near the river. Elk, mule deer, beavers, and coyotes also pass through the meadows on a regular basis. Your odds usually improve at dawn or dusk, when animals are on the move.
Kawuneeche Valley works well as the west-side base for your drive. You can pull over along Trail Ridge Road for short viewing stops, or take a simple walk on the Coyote Valley Trail. That trail is level, wheelchair-accessible, and covers 1.9 miles round trip in about 30–45 minutes. The Holzwarth Historic Site is another easy stop, with a 0.5-mile walk to a preserved 1920s ranch site.
For a trip that spans more than one day, this area fits nicely as your west-side day. September is a sweet spot, with fall color and more animal activity. That’s why early starts and flexible weather plans matter here.
Tips for Planning a Multi-Day Rocky Mountain Road Trip
A multi-day trip gives you room to slow down, pull over more often, and deal with altitude and weather without turning the drive into a grind. That matters on a route like this. The seven stops go a lot better when you have time to breathe.
Start Early for Parking and Wildlife
If you want parking, wildlife, and cooler air, start early. Bear Lake parking lots can fill by 5:30–6:30 AM during peak season, and the Alpine Visitor Center lot often gets crowded by midday. Starting before 8:00 AM from the east entrance helps you beat the crowds, find parking more easily, and catch wildlife during its most active hours.
This is especially helpful for stops like Many Parks Curve, Rainbow Curve, and the Alpine Visitor Center, where things get busier as the morning moves on.
One more detail that can save you a headache: if you enter the Bear Lake Road corridor before 5:00 AM, you can get in without a timed entry reservation.
Once you’re on the road, the next two things that shape your day are altitude and weather.
Plan for Altitude and Weather
High elevation changes the pace of the trip. Start slow and give your body time to adjust. The high points along Trail Ridge Road are a different beast than the lower stops on Bear Lake Road.
If you’re coming from a lower elevation, it helps to spend your first day in Estes Park, which sits around 7,500 feet, before heading up to the higher areas. Drink plenty of water, and skip heavy meals and alcohol.
The temperature shift can catch people off guard too. Above 11,000 feet, it can be 20–30°F colder than it is down in the valley. And the weather can turn in a hurry above treeline.
A simple layering system usually does the job:
- A moisture-wicking base layer
- A fleece mid-layer
- A waterproof, windproof outer shell
That setup covers most conditions without overpacking.
Leave Time for Stops
This drive works best when each overlook feels like a pause, not a box to check. On paper, the drive takes about 1.5–2 hours without stops. In real life, once you add overlooks and short walks, plan on 6–8 hours.
Even parking can slow things down. The Alpine Visitor Center lot alone can add 20–30 minutes during busy periods. Build in buffer time at each stop. If you rush, the whole day starts to feel like traffic with scenery.
A couple of practical things are easy to forget until it’s too late. Fill your gas tank in Estes Park or Grand Lake before you start, because there are no gas stations on Trail Ridge Road. And cell service drops out at higher elevations, so download offline maps before entering the park.
Conclusion
These seven stops can turn one drive into a multi-day route through forests, lakes, tundra, and wildlife habitat.
If you want a shorter itinerary, stick with the stops that give you the most for your time. Many Parks Curve, Forest Canyon, and the Alpine Visitor Center are strong picks. Then add Bear Lake Road for lakes and Kawuneeche Valley for wildlife.
Trail Ridge Road usually runs from late May to mid-October, and timed entry is required. So the biggest calls you’ll make are simple: when to go, where to park, and how to deal with weather.
Use these seven stops as a flexible plan, then adjust based on conditions, your pace, and how much time you have.
FAQs
When is the best time to drive Trail Ridge Road?
The best time to drive Trail Ridge Road is late June through September. That’s when the full route is usually open, and the alpine wildflowers are in bloom.
For the best views, aim for early morning or late afternoon. The light is better, parking at popular overlooks is easier to find, and you’re less likely to get caught in those afternoon alpine thunderstorms that can roll in fast.
It’s also smart to check current road conditions before you go. Even in summer, weather and snowpack can still lead to temporary closures.
Do I need a timed-entry reservation for both roads?
Yes. During peak season, from late May through mid-October, timed-entry reservations are usually required for these areas.
A standard park access permit covers Trail Ridge Road. But the Bear Lake Road corridor needs a separate reservation.
These reservations are checked daily from 5 a.m. to 6 p.m. If you arrive outside those hours, you can still enter without one.
Which stops are best if I only have one day?
For a one-day trip, put Bear Lake and Trail Ridge Road at the top of your plan. It’s a simple way to see a lot in one day without feeling rushed.
Start at Bear Lake for classic alpine scenery and easy walks to Dream Lake and Emerald Lake. The area is one of the best spots for a short outing that still feels like a full mountain experience.
Then drive Trail Ridge Road and pull over at overlooks like Many Parks Curve, Rainbow Curve, Forest Canyon, and the Alpine Visitor Center. This route gives you a great mix of wildlife, big mountain views, and short walks.