
A good group day in a national park comes down to four things: pick the right activity, check park rules, pack for safety, and run the day with a clear plan. If I skip any one of those, the trip gets harder fast.
Here’s the short version:
- I start with the group: size, age, fitness, experience, and health needs.
- I choose an activity the park allows and set a firm turnaround time.
- I check the official National Park Service page for permits, reservations, alerts, trail closures, and weather.
- I assign jobs, usually one trip lead and one safety lead.
- I build a backup plan for storms, fatigue, closures, or access problems.
- I do head counts at the start, during the activity, and before leaving.
That matters because park plans can change fast. A trail can close the same day. Heat, smoke, flash floods, and shuttle delays can turn a simple outing into a problem. In many parks, group size limits, timed entry, and permit rules also affect what I can do and when I can do it.
My rule: I plan for the slowest or least experienced person, not the strongest one. That one choice helps keep the whole group safer and makes the day smoother.
If I want a trip that stays on track, I keep the plan simple: match the activity to the group, confirm the rules, pack the right gear, and be ready to change course early.
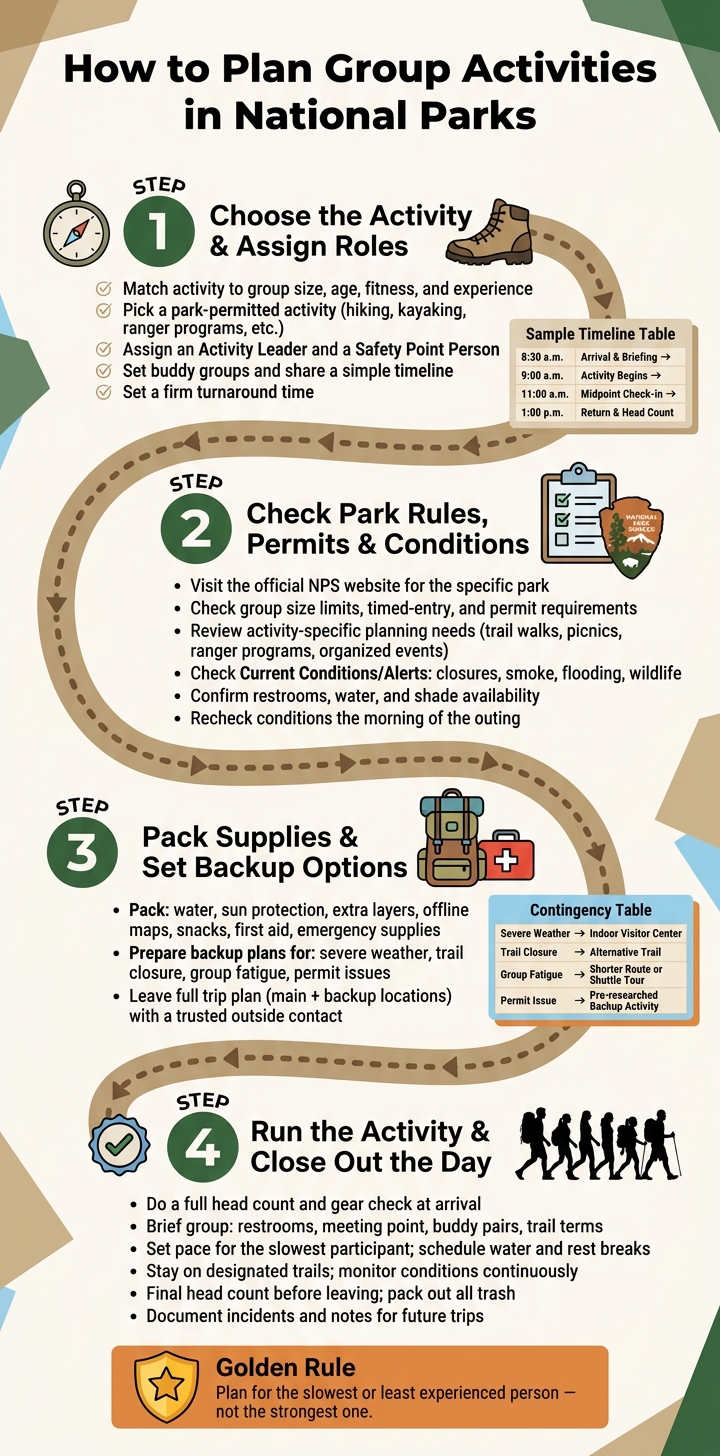
How to Plan Group Activities in National Parks: 4-Step Guide
Step 1: Choose the Activity and Assign Roles
Pick an Activity the Park Permits
Start with the group profile you already built, then narrow the list to activities the park allows. That could mean hiking, wildlife viewing, photography, ranger-led programs, stargazing, kayaking, cave visits, or tide pool visits, depending on the park and the time of year.
If you’re comparing hikes, line up the distance and elevation gain with what the group can comfortably handle. A trail might look great on paper, but if it’s too long or too steep for part of the group, it’ll turn into a grind fast.
Before you lock anything in, check the National Park Service website for that specific park. Confirm permit rules, reservation needs, ranger-led program times, and any current closures.
Assign Leaders, Buddy Groups, and a Simple Timeline
Once you’ve picked the activity, assign two key roles: an activity leader and a safety point person.
The activity leader handles the itinerary, gets any needed permits, and estimates entrance fees and transportation costs. The safety point person checks that the group packs the gear it can’t do without, including navigation tools, a first-aid kit, emergency supplies, sun protection, and enough water. This person should also keep an eye on weather, alerts, and closures.
Set up buddy groups too, so no one goes through the day alone. Then share the basic plan with everyone before departure:
- Meeting point
- Start time
- Planned checkpoint
- End time
A simple timeline helps keep everyone on the same page. For example:
| Time | Activity |
|---|---|
| 8:30 a.m. | Arrival at meeting point, group briefing |
| 9:00 a.m. | Activity begins |
| 11:00 a.m. | Midpoint check-in |
| 1:00 p.m. | Return to meeting point, head count |
Set a firm turnaround time. It keeps the day moving and gives the safety point person a clear point to change the plan if conditions shift or someone starts struggling.
Next, verify permits and current conditions before you lock in the plan.
sbb-itb-00512f3
Step 2: Check Park Rules, Permits, and Current Conditions
Before you lock in your plan, check the park’s rules. Every park is a little different, and those rules can shift by season. Something that’s fine in one park might need a reservation or permit in another. Once you have the rules, line them up with your group size and what you plan to do.
Review Group Limits, Reservations, and Permit Requirements
Start with the official NPS website for the park you’re visiting. Check for group size limits, parking for more than one vehicle, and whether your activity needs a special use permit. That’s often required for organized group use. Some parks, including Glacier, Yosemite, Arches, and Rocky Mountain, also use timed-entry or lottery reservations, and those spots can fill up months in advance.
If the website leaves gaps – especially around permit deadlines, group-size limits, or accessibility needs – contact the park office by phone or email.
Use a Quick-Reference Table to Compare Planning Needs
How much prep you need depends a lot on the activity itself. Use this table as a starting point, then check the details with your park.
| Activity Type | Likely Planning Needs | Location Requirements | Possible Permit Considerations |
|---|---|---|---|
| Trail Walk | Match trail difficulty to group ability and the forecast | Designated trailheads | Group size limits; wilderness permits for overnight stays |
| Picnic Activity | Check facility availability against group size and timing | Designated picnic areas | Reservations for group pavilions; food storage rules |
| Ranger-Led Program | Verify schedule and capacity against group size | Visitor centers or amphitheaters | Advance registration often required for limited-capacity talks |
| Organized Event | Coordinate with park staff on site, timing, and group limits | Specific reserved sites | Special Use Permit; insurance or fee requirements |
Requirements vary by park and activity; confirm with the park.
Check Weather, Closures, and On-Site Facilities
Next, check the park’s Current Conditions/Alerts page for closures, smoke, flooding, and wildlife activity. Download maps, trail guides, and permit details before you arrive. It also helps to match your notes to the park’s posted units so you don’t mix things up once you’re on-site.
Then confirm that the basics your group needs – restrooms, drinking water, and shade – will be open and available. These can close by season or for maintenance. Last, check conditions again the morning of your outing. Flash floods and fire restrictions can change in just a few hours.
With the rules and conditions sorted out, you’re ready to pack for the weather and access needs you found.
Step 3: Pack Supplies and Set Backup Options
Pack your gear and lock in backup plans before you head out.
Pack Safety Gear and Gear
Have the activity leader and the safety point person double-check the packing list and the backup plan. Bring enough water, sun protection, extra layers, offline maps, snacks, first aid, emergency supplies, and any gear tied to the activity for the whole group.
If you’re doing a multi-day backpacking trip, use a lightweight checklist that covers your sleep system, shelter, food, safety equipment, and gear that helps limit impact on plants and wildlife.
Plan for Weather Changes, Fatigue, and Access Needs
Pick one backup route or backup activity ahead of time for each part of the plan , or use a national park itinerary generator to map out alternatives. That way, you’re not making hard calls on the fly.
If the main trail becomes inaccessible, line up a shorter, lower-elevation route nearby. If conditions outside get worse, shift to a nearby indoor regrouping spot like a visitor center. And if the group runs out of steam earlier than expected, be ready to switch to a shorter route, a scenic drive, or a shuttle-based scenic tour.
| Contingency Factor | Backup Action |
|---|---|
| Severe weather | Move to an indoor visitor center |
| Trail closure | Switch to an alternative trail with similar difficulty |
| Group fatigue | Shorten the route or switch to a shuttle-based scenic tour |
| Site closure or permit issue | Switch to a pre-researched permitted backup activity |
Leave your full trip plan with a trusted contact outside the group. Include your main location and your backup options. With gear packed and backup choices set, you can move into the arrival briefing and day-of check-ins.
Step 4: Run the Activity and Close Out the Day
With your gear packed and your backup plan ready, this is the part where the day has to run smoothly in the field.
Arrival and Group Briefing
As soon as the group arrives, gather everyone at the trailhead and do a full head count before anybody heads off. Then check that each person has the must-have items from the packing list. That includes an offline map downloaded before arrival, because cell service is often unavailable inside park boundaries.
Go over the basics right away:
- Show the group where the restrooms are
- Name the designated meeting point in case anyone gets separated
- Confirm the buddy pairs from Step 1
Before you start walking, do one last check for closures or hazards.
It also helps to clear up trail terms with the whole group. On an out-and-back trail, the return trip means the one-way distance gets doubled. On a loop trail, make sure everyone knows the finish point before you begin.
Keep the Group on Track During the Activity
Set the pace for your slowest participants. That might mean children, older adults, or anyone feeling the effects of heat or altitude. If one person is dragging, the whole group pace needs to match that. That’s just how good group travel works.
Plan water and rest breaks ahead of time instead of waiting for someone to speak up. A lot of people wait too long to say they’re tired, thirsty, or overheated.
If you’re in a park with shuttle service, keep a close eye on shuttle timing during moves between areas so the group stays on schedule.
Stay on designated trails and approved areas the entire time. Keep noise down near wildlife. And if conditions start to change – sudden weather, an unexpected closure, or clear group fatigue – use the backup plan you set in Step 3. Switch early when weather, closures, or fatigue change.
Final Head Count, Cleanup, and Notes for Next Time
Before anyone leaves the park, close out the activity fully. Run a final head count. On out-and-back trails, confirm that everyone made it back to the starting point. On loop trails, verify that every group member reached the designated finish point.
Once everyone is accounted for, do a final sweep of the area. Pack out all trash and leave no physical impact on the site.
Before you drive away, write down any incidents, trail conditions, and fixes that would help next time. Then save those notes with the trip plan.
Conclusion: Review the Plan Before You Go
Once you finish the planning steps, do one last review before you leave. Good group outings usually come down to choices made before you get there. Match the activity to the group, confirm permits, pack the right gear, and make sure everyone has a clear role.
Use the official park page as your last check before departure. Then look at closures, alerts, and the weather forecast. Conditions can change fast in high-elevation or desert areas. If you’re taking a coastal route, check tide predictions too.
The goal is a flexible plan that helps keep the group safe and shows respect for the park.
FAQs
Do I need a permit for a group outing?
Often, yes. Many popular national parks require permits, timed-entry reservations, or campground reservations for organized group activities.
The rules can change from one park to the next, and they often shift by season too. That’s why it helps to check your destination’s requirements well ahead of time. A little planning now can save you from delays later and help protect park resources.
What group size works best in a national park?
The right group size comes down to two things: what you’re doing and the park’s rules.
If you want a more focused experience, a smaller group of 3 to 5 people is often the sweet spot. It’s easier to move around, easier to keep things quiet, and usually a lot less stressful.
For ceremonies or elopements, 10 people or fewer is often the better call. Smaller groups tend to have less impact on the area and give you more flexibility with location options. It’s also smart to check the park’s exact limits before you go, especially for backcountry areas and campsites.
What should I do if weather changes suddenly?
Put safety first. Check the park’s official website before you go so you can see live alerts for trail closures, weather issues, or access limits. It’s also smart to have a backup plan, whether that means a different activity or another part of the park that’s still open.
If you’re already out on a trail, reach out to park rangers or staff for advice on current conditions and safe alternate routes. Bring extra layers and basic navigation tools so you’re not caught off guard.