
If I want to plan a paddle trip fast, I do three things first: find a designated trail, check the local manager for current conditions, and confirm access and permit rules before launch.
Here’s the short version: a National Water Trail is a public water route for small craft like kayaks, canoes, and rafts. The label does not make it a national park. It means the route meets set standards for public access, route continuity, and care by partner groups.
Before I head out, I keep these points in mind:
- Designation has rules: the trail must be public, connected, and cared for with records to back that up.
- Federal and local roles are different: the Secretary of the Interior designates the trail, while local managers handle launch sites, closures, hazards, and permits.
- Trip planning takes more than a map: I check distance, current, portages, weather, and water levels.
- Rules can change by section: one stretch may allow landing or camping, while another may not.
- Safety comes first: I bring 1 life jacket per person, navigation tools, water, food, layers, first aid, and I share my route plan with someone on shore.
A few facts stand out:
- There are 3 main route types in this system: rivers/streams, canals, and tidal waterways.
- At least 4 core checks matter before a trail gets the label: public access, continuity, stewardship practices, and maintenance records.
- My last trip-day check should cover 2 things: weather and waterway advisories.
| What I need to know | Short answer |
|---|---|
| What is it? | A designated paddling route in the National Trails System |
| Who gives the designation? | The Secretary of the Interior |
| Who gives trip-day details? | The local trail manager |
| Where do I start? | NPS.gov for listings and maps |
| Where do I check permits? | Recreation.gov and the local manager |
| What should I verify last? | Access, closures, hazards, weather, and water levels |
My takeaway: I use the federal listing to compare routes, but I trust the local trail manager for the latest facts that affect the day on the water.
The State of Water Trail Programs
sbb-itb-00512f3
How Trails Earn National Water Trail Designation
Not every river or stream makes the cut. To earn National Water Trail designation, a trail has to meet a set of standards. For travelers, that label means a route has recognized public access, route continuity, and a stewardship system behind it.
That matters more than it may sound at first. It tells people the route isn’t just marked on a map. It has been set up, cared for, and prepared for public use.
Designation requirements at a glance
The main eligibility standards include:
- Public access: The trail must be open to the public.
- Route continuity: The route must be continuous.
- Accepted stewardship practices: Trail managers must follow accepted stewardship practices.
- Stewardship documentation: Applicants must provide records showing ongoing maintenance and coordinated management across the groups and agencies involved.
Once a trail clears those standards, applicants can submit it for review.
Application and review process
Applicants need to submit proof that the trail meets the standards and has a long-term management partnership in place. That proof can include trail maintenance records, cleared access points, and drainage work.
After designation, management moves to the partnership responsible for the trail.
Who Designates, Supports, and Manages These Trails
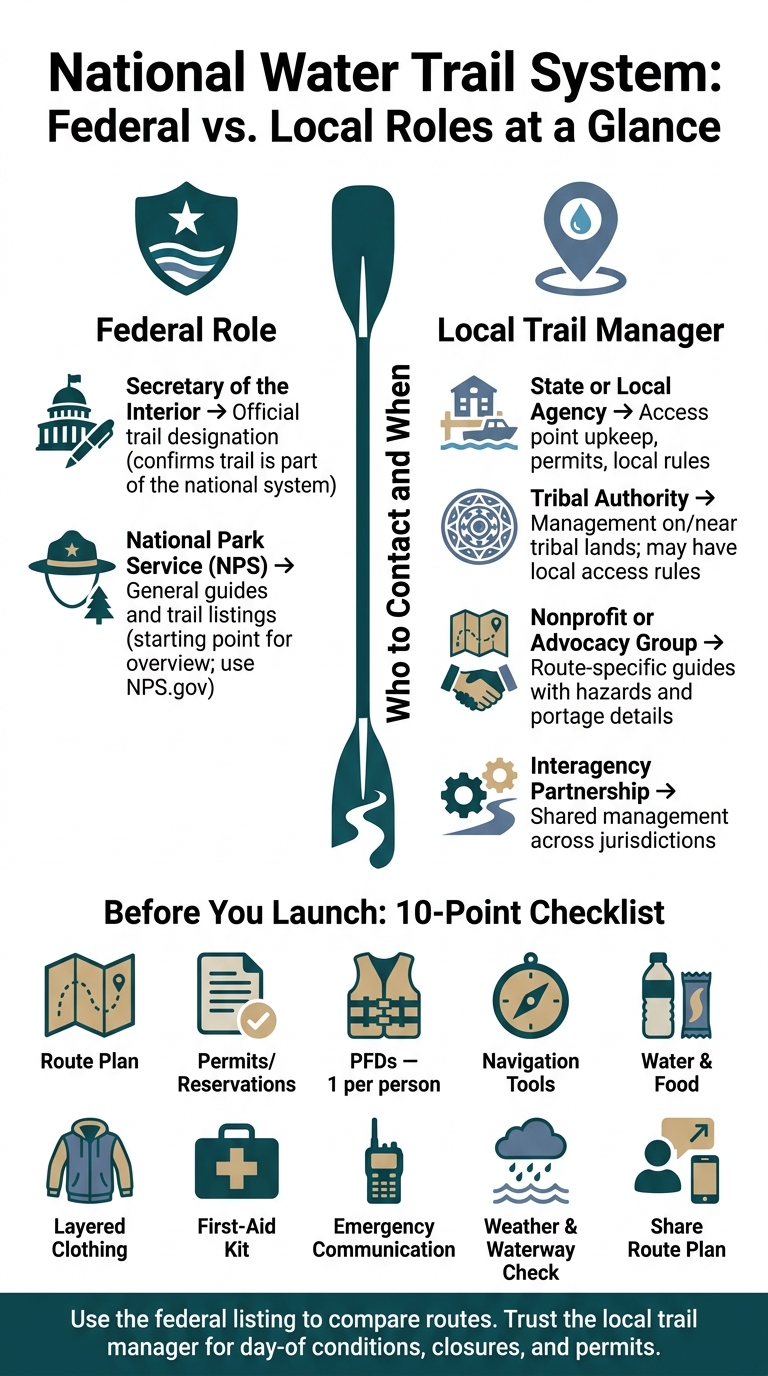
National Water Trail Designation: Who Does What & How to Plan
Federal designation and local management are not the same thing on National Water Trails. That split matters. If you know who does what, you can find launch points, maps, and closures without wasting time.
And in most cases, the local trail manager is the best place to check for launch conditions, access updates, and other trip-day details.
Federal role versus local trail manager role
The Secretary of the Interior officially designates National Water Trails. The National Park Service (NPS) supports the system with general guides and trail listings.
But the day-to-day work happens at the local level. That local manager might be a state agency, tribal authority, nonprofit, or an interagency partnership. So if you’re planning a trip, the federal listing gives you the big picture, while the local manager usually gives you the details that affect your paddle that day.
Management responsibilities comparison
| Organization | Typical Responsibility | What It Means for You |
|---|---|---|
| Secretary of the Interior | Official designation of the trail | Confirms the trail is part of the national system |
| National Park Service (NPS) | General guides and trail listings | Good starting point for an overview |
| State or local agency | Access point upkeep, permits, local rules | Contact for launch details and permit requirements |
| Tribal authority | Management of trails on or near tribal lands | May have local access rules |
| Nonprofit or advocacy group | Route-specific guides with hazards and portage details | Useful for on-the-ground route information |
| Interagency partnership | Shared management across jurisdictions | Coordinates trail operations among partners |
Get current water levels, closures, and hazards from the local trail manager.
Once you know who manages the trail, you can check access, rules, and conditions before you launch.
How to Plan a River or Stream Trip Using the System
Find the route, access points, and local rules
Once you know the trail is designated, use the listing to map out the trip. Start on NPS.gov. The National Park Service’s interactive map lets you pick your state and browse designated trails. From there, each site page usually covers how to get there and where access points are located.
After you find a trail, check the route details and see whether you need a permit or reservation. If the route moves across more than one land jurisdiction, access rules can shift from one section to the next. Recreation.gov is the main place to check federal permits and reservations. Then verify the day-of details with the local trail manager so there are no surprises at the launch.
Check conditions and match the trip to your skill level
A general difficulty label only tells part of the story. Dig into route descriptions that spell out distance, current, portages, and hazards. That gives you a much better read on whether the trip fits your group.
Before heading out, check the weather forecast, current water conditions, and any closure alerts.
Set the route length and difficulty based on the least experienced paddler in your group. That’s the safest way to plan. If someone in your party has accessibility needs, look for details on amenities and access features ahead of time so you can plan with fewer unknowns.
Before you launch checklist
Run through this before you put anything in the water:
- Route plan: Confirm your launch and takeout points
- Permits or reservations: Have printed or digital proof ready, if needed
- PFDs: One properly fitted life jacket for each person
- Navigation: Bring maps, GPS, or a trail guide
- Essentials: Pack water, food, and sun protection
- Clothing: Wear layers that fit the season and water temperature
- Safety gear: Bring a first-aid kit and emergency supplies
- Communication: Have a dependable way to contact emergency help
- Condition check: Do one last review of weather and waterway advisories before departure
- Share your route plan and emergency contacts with someone on shore
Example Trails, Responsible Use, and Key Takeaways
Designated trail examples across the United States
Water trails can look very different from one place to the next. Some follow rivers or streams. Others run through canals or tidal waters. That variety is a big part of the National Water Trails System across the United States.
What matters in practice is simple: every route has its own setup. Access points, water conditions, and local rules can all change depending on the trail. A route that feels easy to plan on paper may work very differently once you look at launch sites, take-out points, and day-to-day conditions.
Responsible travel on routes that cross multiple jurisdictions
A single water trail can pass through more than one jurisdiction, and the rules may shift as you go. One section may require permits, while the next may have different camping limits or waste disposal rules. Some stretches require you to pack out all waste. Others limit campfire use or control where you can bring your vessel ashore.
Private land along the banks also matters. Just because you’re traveling on the water doesn’t mean every shoreline is open for landing or camping. It’s worth checking each segment before your trip instead of assuming one set of rules applies to the whole route.
What to remember before planning a water trail trip
The main upside of the system is that it makes route comparison easier before you paddle. You can look at different trails side by side and get a better sense of what fits your trip.
Still, the federal designation is only part of the picture. Local trail managers usually have the latest details on access and current conditions. Difficulty labels can also give a false sense of certainty, so check the route itself – length, obstacles, amenities, and current conditions – before deciding if it matches your skill level. Use the system to compare routes, then use the local manager for the latest rules and on-the-water updates.
FAQs
How do I know if a water trail matches my skill level?
Start with the official managing agency for that trail, such as the National Park Service. Check current water conditions, required safety gear, closures, and any weather-related hazards before you head out.
Water trails can vary a lot. Some are calm and easy to access, while others are much tougher. If you’re not sure what to expect, contact the managing agency directly for up-to-date information and advice that fits your experience level.
What should I do if trail rules change between sections?
Check official resources for each section. Rules can change when management shifts between agencies or local landowners, including permits, group size, and access.
Before you enter a new section, check the official park or trail page for alerts, safety notices, and local guidelines. If anything seems unclear, contact the local park office or rangers before you move on.
Who should I contact for same-day water trail updates?
Contact the agency that manages that part of the trail directly. The best move is to call the park or the right office – like the Bureau of Land Management or the U.S. Forest Service – for up-to-date details on trail conditions, closures, and weather issues.
You can also check the official National Park Service website for general alerts and safety notices. If you are deaf or hard of hearing, you may use the Telecommunications Relay Service.